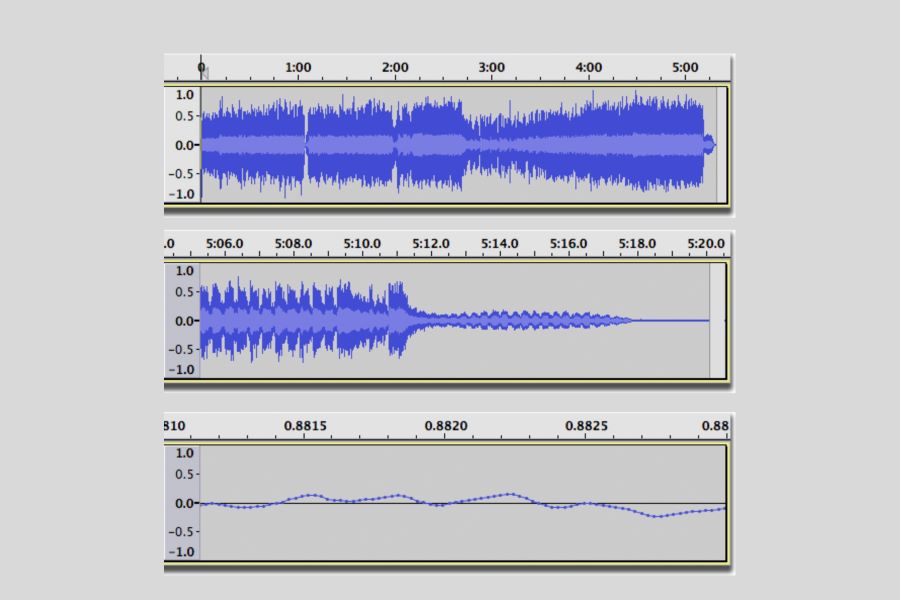
Audacity is a powerful, free open-source software that can help you do just that. But one of the best features it offers is its ability to zoom in and out on any part of your podcast. This allows you to get up close and personal with each track or section, making editing much more precise.
In this guide, we’ll show you how to use Audacity’s zoom tool and provide some tips for getting the most out of it so that you can start making your podcast recordings sound their best. Let’s get started!
Related: How To Edit A Podcast In Audacity
How To Zoom In Audacity?
Zooming in Audacity is not difficult, but there are several methods to choose from. Here’s a quick overview of them:
- Using the View menu
- Using the keyboard shortcuts
- Using the zoom buttons on the toolbar
- Dragging with your mouse wheel or trackpad
1. The View Menu
The quickest way to zoom in Audacity is to use the View Menu. There are simple steps to follow to be able to zoom in and out of your project.
Step One: Open The View Menu.
The first step to zooming in Audacity is to open the view menu. Click on View, located at the top of the workspace.
Step Two: Select Zoom In From The Drop-Down Menu.
Once you have opened the view menu, select zoom in from the drop-down list. This will magnify the project, making it easier to see details in your waveforms.
Step Three: Repeat As Necessary.
If the project is still too small for you to see the details you need, repeat step two until you are happy with the level of magnification. To zoom back out, select Zoom Out from the drop-down menu. The normal default zoom level is 100%.
Step Four: Save Your Changes.
Once you are done with zooming in and out, don’t forget to save your changes. Click on File at the top of the workspace and select Save Project from the drop-down menu. This will ensure that all of your zoom adjustments have been saved.
2. The Keyboard Shortcuts
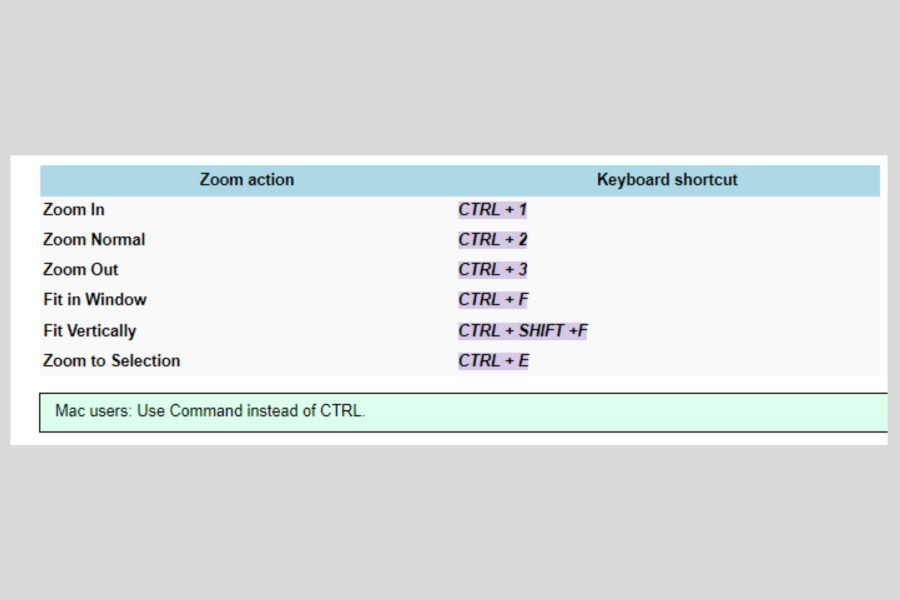
The second way to zoom in Audacity is by using keyboard shortcuts. This method is faster than using the view menu and can help you quickly adjust your magnification levels with ease.
Here are the keyboard shortcuts for zooming in Audacity:
- Zoom In – Ctrl + (Command) + ‘+’
- Zoom Out – Ctrl + (Command) + ‘-‘
- Fit Width – Ctrl + (Command) + 0
If you’re on Mac, replace Ctrl with Command. These zoom commands are really simple to remember and can be used quickly and easily. Keyboard shortcut equivalents for zooming in Audacity can also be found on the main toolbar. Any zoom action keyboard shortcut can be accessed through the Keyboard Shortcuts window located under the Edit menu.
3. Zoom Buttons on the Toolbar
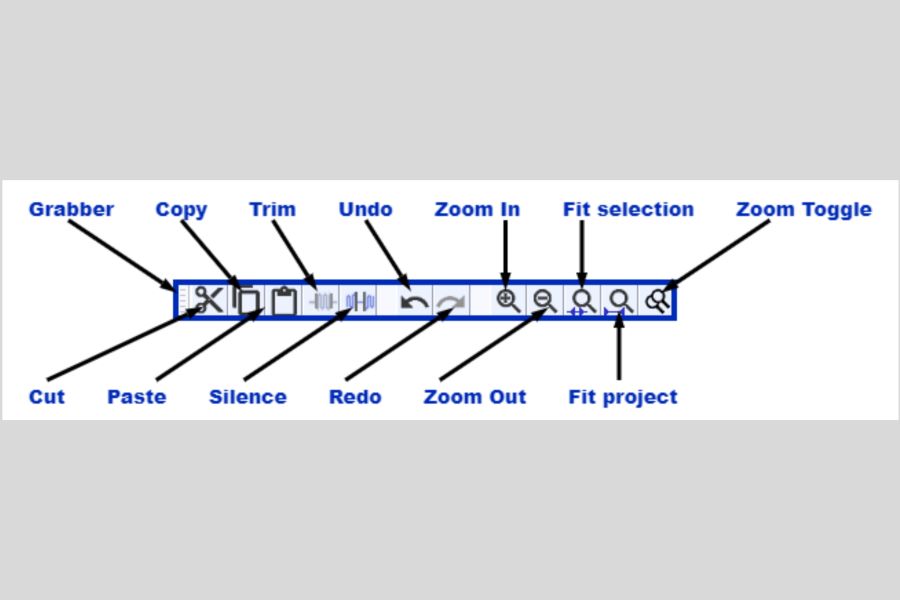
The third way to zoom in Audacity is by using the zoom buttons located on the toolbar. To do this, select the area you want to zoom in on by clicking and dragging your mouse cursor over it. Then, press the ‘Zoom In’ button located next to the Play/Stop button. Every time you press this button, you will zoom in further. If you want to go back one step, you can press the ‘Zoom Out’ button. This is an easy and efficient way to get your desired zoom level in Audacity for all the tracks.
If you want to zoom in further, you can use the Zoom Slider located beneath the project window. This slider lets you control your desired level of magnification without having to press the zoom buttons multiple times. Simply move the slider left and right to adjust your zoom level. You can also use the ‘Zoom to Selection’ button (located next to the Zoom In/Out buttons), which will automatically zoom in so that your selection is centered in the project window.
Vertical zooming is also available in Audacity. To use vertical scale zooming, select the track you want to zoom in on and press the ‘Vertical Zoom’ button. Then, drag your mouse up or down over the selection to adjust the vertical zoom level.
4. Dragging with Your Mouse Wheel or Trackpad
The fourth way to zoom in Audacity is by dragging with your mouse wheel or trackpad. This method will allow you to quickly and easily zoom in and out of the project window. To do this, simply click and hold on to the project window with your mouse (or trackpad), then drag it up or down while pressing the mouse wheel button.
Your mouse pointer position will determine the level of magnification. For more precise zooming, you can use the Zoom Slider located beneath the project window. This allows you to adjust your zoom level in small increments without having to click and drag with your mouse.
The further you move your cursor, the more the project window will zoom in and out. This is particularly useful for quickly pinpointing specific sections of a recording that you need to work on or for zooming into editable regions within the timeline. Zoom horizontally or vertically with your mouse wheel to get a better view of the project window. Audacity’s default zoom level is set to 100%, but you can change it as needed.
These four methods are the most common ways to zoom in and out of Audacity. They all offer different levels of control and flexibility when it comes to magnifying or shrinking your project window. Time scale zooming, snap to grid, and zoom extents are a few additional ways to adjust your magnification levels in Audacity. For more information on these topics, please refer to the official Audacity documentation.
You can also check out other related Audacity posts, such as how to cut audio and how to delete an audio section.
FAQs
What Is Zoom Tool In Audacity?
Zoom tool in Audacity is a great way to work with audio files and makes editing much easier. This advanced mode allows you to zoom in and out of a waveform so you can see more details, such as transients or fine frequency nuances. With the Zoom tool, you can also contact sections to magnify them further, making it easier to select effects precisely. Zoom vertically or horizontally, or both in combination.
Zooming will update the selection display properties and adjust your view to fit height as well as width while still providing an overview of the entire track. A smooth workflow within Audacity includes knowing how and when to use this incredibly helpful feature.
Why Is It Important To Save Projects In Audacity?
It is important to save your project in Audacity when you are done working on it through the edit toolbar, as this will ensure that all the changes and adjustments you made have been saved.
It also allows you to reopen the project later or transfer it to another computer if needed. Saving a project in Audacity also helps you to stay organized, as it allows you to keep track of your progress and navigate easily between different versions of the same project.
Saving projects in Audacity also create backups that can be used in case anything goes wrong or if you make any mistakes while editing.
Conclusion
Now that you know how to zoom in Audacity, you can make the most of the program’s powerful editing capabilities. Zooming allows you to work with audio more precisely and accurately. Whether it’s creating a seamless transition between two clips, vertical/horizontal zooming, or making minor adjustments to a sound effect, zooming in Audacity is an essential part of your workflow. With practice, you’ll be a pro in no time! Just remember to use the Zoom tool, the keyboard shortcuts, and the ruler bar for easy navigation.
For more Audacity editing tips, check out our post, “How To Make Your Voice Sound Better In Audacity.”


