Podcast Editing Tips: The Complete List

by | Podcast Editing Software

podcast editing tips
This is the most comprehensive list of Podcast Editing Tips.

I personally compiled and reviewed 108 podcast editing tips and techniques you can use today split into categories.

So if you want to make your podcasts sound professional, you’ll love this list.

Let’s dive right in.

Plan ahead

Before you hit that record button, you will want to have a good idea of what you are going to cover on your newest episode. Planning your episode will go a long way to avoid multiple takes and a long list of edits later on.

Expert Opinion:

It’s tempting to jump right in and start recording, but you may want to do some planning in advance to ensure that you won’t have to re-record large portions of your show later.

1. Brainstorm: I start by choosing a show topic from my list […]. I brainstorm the points that I want to make for the episode, the general narrative thread for the episode as well as a conclusion.

2. Research: If necessary, I’ll pull any statistics or quotes that I can use to support the points I’m making. […]

3. Outline: I reduce my page(s) of brainstorm scribbles to a concise outline comprising three bullet points and a headline. […]

Research your favourite shows

Not only will it give you ideas for the format of your podcast as well as delivery, content, etc but most of the time they will list their equipment, so you may find it useful if you are aiming for a similar recording quality. And if they don’t, you can still drop the audio file into the DAW to use as a reference when mixing & mastering in later stages.

Write a script, even if you do interviews
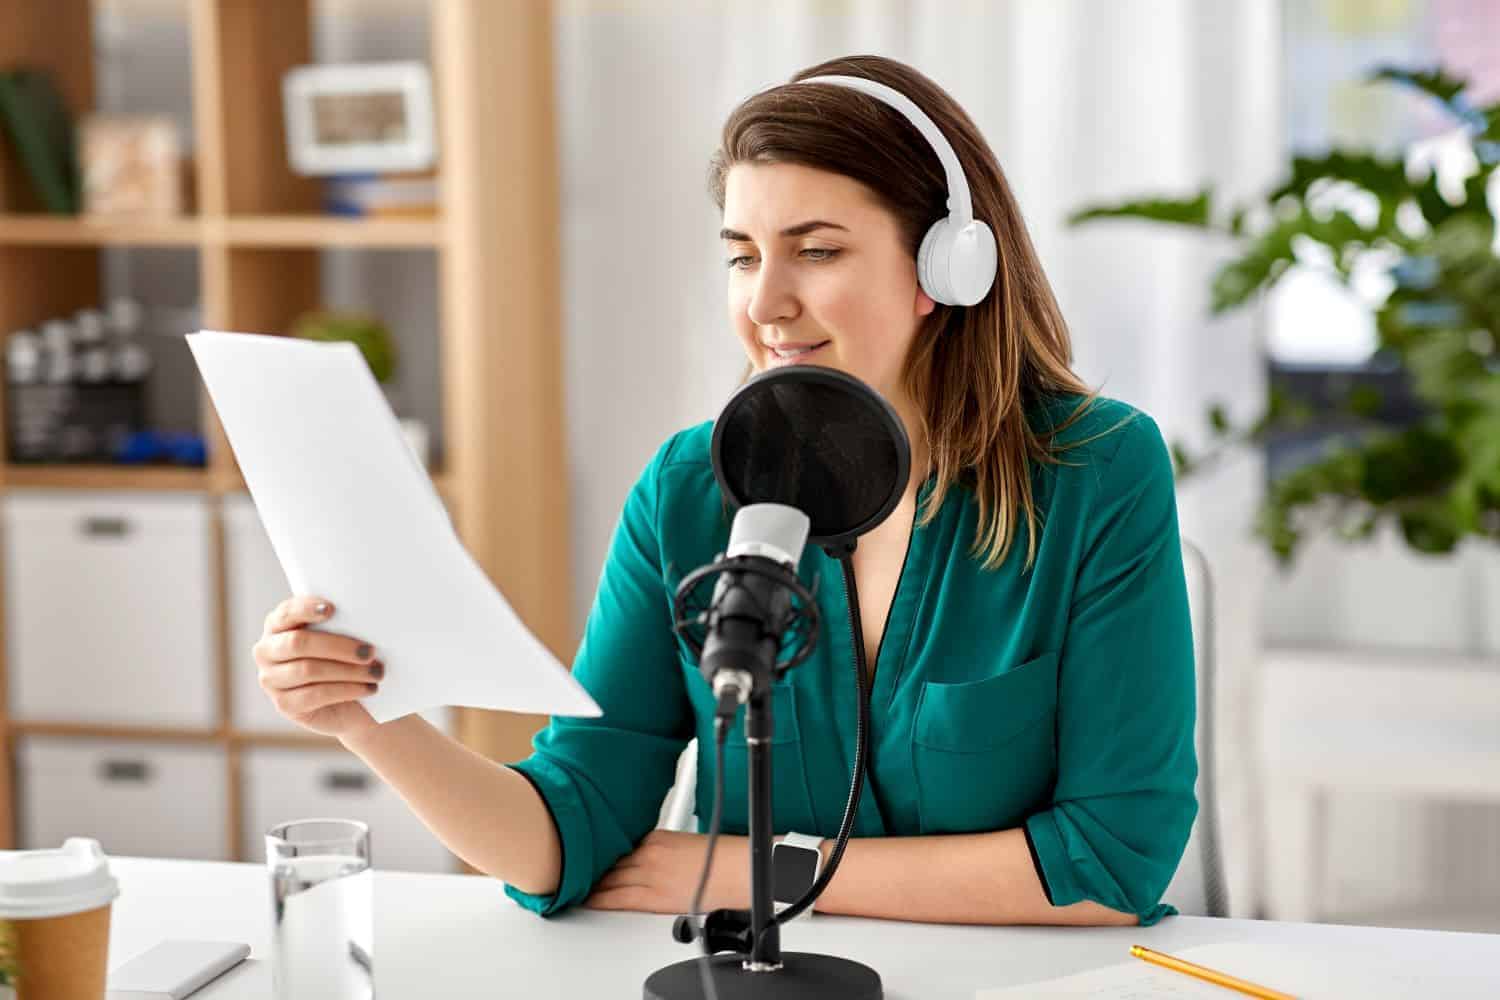
Write a script for yourself, especially for the intro and outro of each episode. We get clients every day asking to remove the pauses and extra breaths they take between words while they think of the next word. Writing a script for the introduction and the conclusion helps in your delivery because you can read it! Even if you are doing interviews, you should have all your questions written down in the manner that you would like to ask them. Yes we can help in the editing but nothing is going to beat a good delivery from a confident host. And if it doesn’t go according to plan…
Script
Having an outline of the episode helps with delivery and keeping the topics focus.

Pick A USB Mic If You Are New To Podcasting

If you are starting out, pick a USB microphone that you can plug directly into your PC or laptop. It may be tempting to get something more complex like an external mixer. But when you are starting out, it’s a sure way of adding unnecessary complexity at the early stages. There may come a time where you need something more involved but by then you’ll know what you are looking for.

Consider A Mic With Mid To Narrow Directional Capability
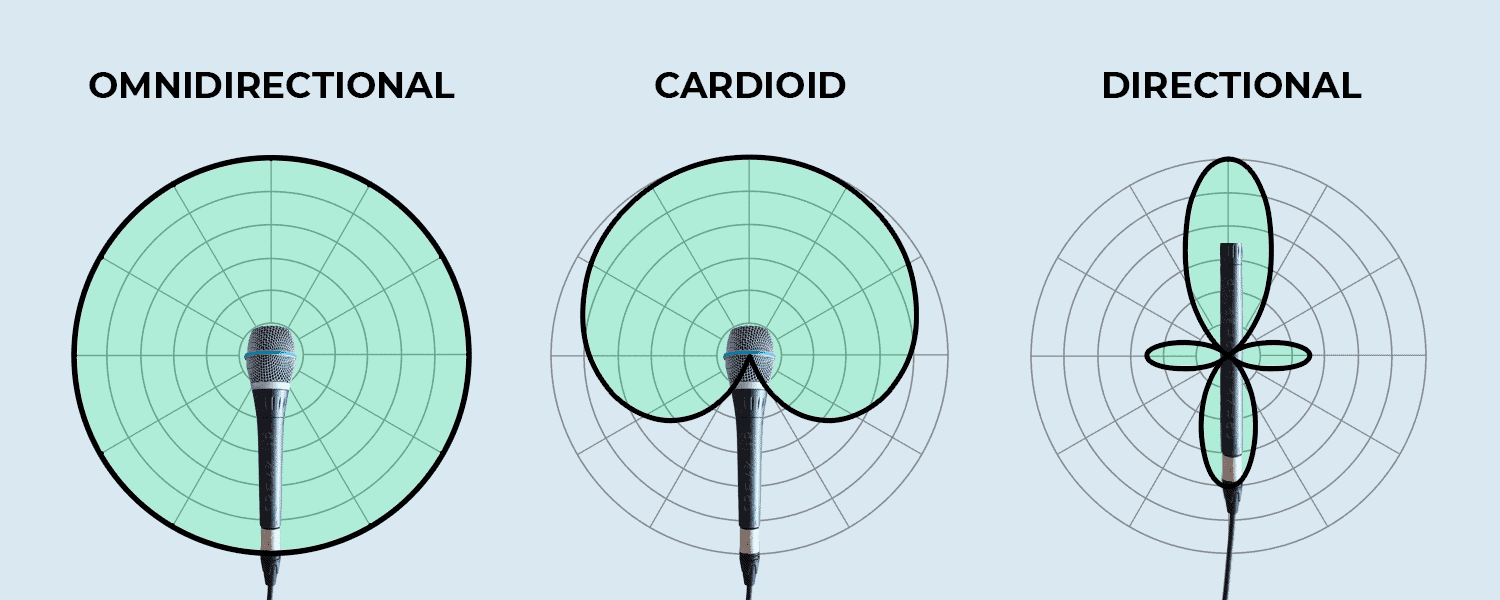
Shotgun mics are so narrow that you’ll have to be very careful to keep your mouth very close or you won’t be heard. If you go too wide in your mic selection you’ll pick up more unwanted background noise. Cardioid are the most popular for a reason, they sit just in the middle making them a great choice for podcasting.
microphone patterns2

Omnidirectional microphones will pick up a lot of background noise while directional is very sensitive to mouth movement.

Take Your Pick of Quality vs Maintenance of Microphones

Condenser microphones offer the best quality because they have the widest frequency response and the best transient response. The downside is that they require more maintenance than Dynamic microphones. Someone new to podcasting may want to pick up a Dynamic mic to concentrate on the practical aspects of recording episodes vs the technical maintenance of the equipment.

Run a quick test before you begin recording

There is nothing worse than going through a recording session to find out later that your settings were wrong and you can’t be heard and you have to redo it from scratch. Running a quick test before starting the session is the best way to ensure everything is setup properly and the voice is coming through as expected.

Pick the right recording levels

Too low and you’ll hear a hiss when increasing the levels during the editing. Too high and your voice will start clipping. Aim for a value between -20dB and -10dB at normal speaking levels. When in doubt, err on the side of being too low, you can always make things louder later on but you can’t recreate the clipped signals.

Prevent distortion

As opposed to noise – a signal from an external source -, audio distortion happens when the recorded signal is affected during recording. It can take many forms but it normally comes up as input overload. Input overload leads to clipping – the signal is amplified to its maximum capacity, at which point the signal cuts or clips. Learn how to identify it and correct it properly in your equipment as it’s impossible to fix later on.

Soundproof the recording room to avoid echoes

Following on the steps of the previous tip, echoes are another one of those things that can affect the production value of your podcast. When aiming for quality, prevention is key. There are multiple ways of reducing echo, the simplest being packing the room with items to absorb the sound. Things like carpets, tapestries, clothes, bin bags, cardboard boxes, etc, as well as picking a room with low ceilings will help greatly with echoes.

Related: How to Set Up a Bedroom Recording Studio + Ideas

Soundproof the recording room

Boxes, carpet, furniture, blankets, bean bags are perfect items to absorb echos.

Avoid background noise

Anton, our Operations Manager, has a saying: “Crap in, crap out.” The post-production process can enhance the production value by several orders of magnitude, but don’t mistake this for magic. If the quality of the recording is bad, the best output you can expect is mediocre. There is no magic wand that can remove all background noises without affecting the vocals. Constant noises like buzzing from a nearby refrigerator are easier to fix than kids or dogs making intermittent noises in the background. Keep this in mind when recording your podcast.

Avoid Sibilance with mic placement

Sibilance – the excessive emphasis of “s”, “sh” and “ch” sounds – can be avoided by adjusting the placement and angle of the microphone. Aim for about 8 inches between the mouth and the microphone for condenser microphones and a bit less for dynamic ones. Also angle the microphone slightly so your breath is not hitting it head on but at an angle. These techniques will help with sibilance and plosives.
mic placement 1
Correct microphone placement before recording will help with delivery and to avoid sibilance and plosives.

The pencil trick can help with both plosives and sibilance

This trick has been floating around for ages as a cheap alternative to a pop filter. It’s very hit and miss so some people may find it useful while others may not. The idea is simple: tying a pencil around the mic – with string, tape or any other method – will split the air coming into the diaphragm and therefore reduce plosives and sibilance.

Mic placement will help with delivery

Not only can it help with mouth noise, sibilance and plosives, setting your mic up to the side, angled slightly toward your mouth, will prevent bursts of air from hitting the capsule directly and can result in a smoother, more natural tone.

Record each speaker in a different track

This is one thing that can improve the quality of your podcast during editing. If you have all the voices on the same file and people talk over each other, there is not much that can be done to help out the conversation flow better or clearer. If instead you record one speaker per track, you can keep all the points of view being expressed by just dragging them sequentially one after the other during the editing process. It makes it trivial to delete grunts or agreements or even rearrange the tracks around to improve flow bringing up the production value.

Watch out for mouth noise

Saliva, lips smacking, dry mouth, all these are nasty noises your listeners don’t want to hear. There are ways to soften or remove these during editing but some of them can’t be totally removed. Mouth noises can be prevented with mic placement and by drinking apple or cranberry juice and avoiding dairy products just before a recording. As always, record a test just before your recording session and adjust.

Invest in a pop filter to avoid plosives
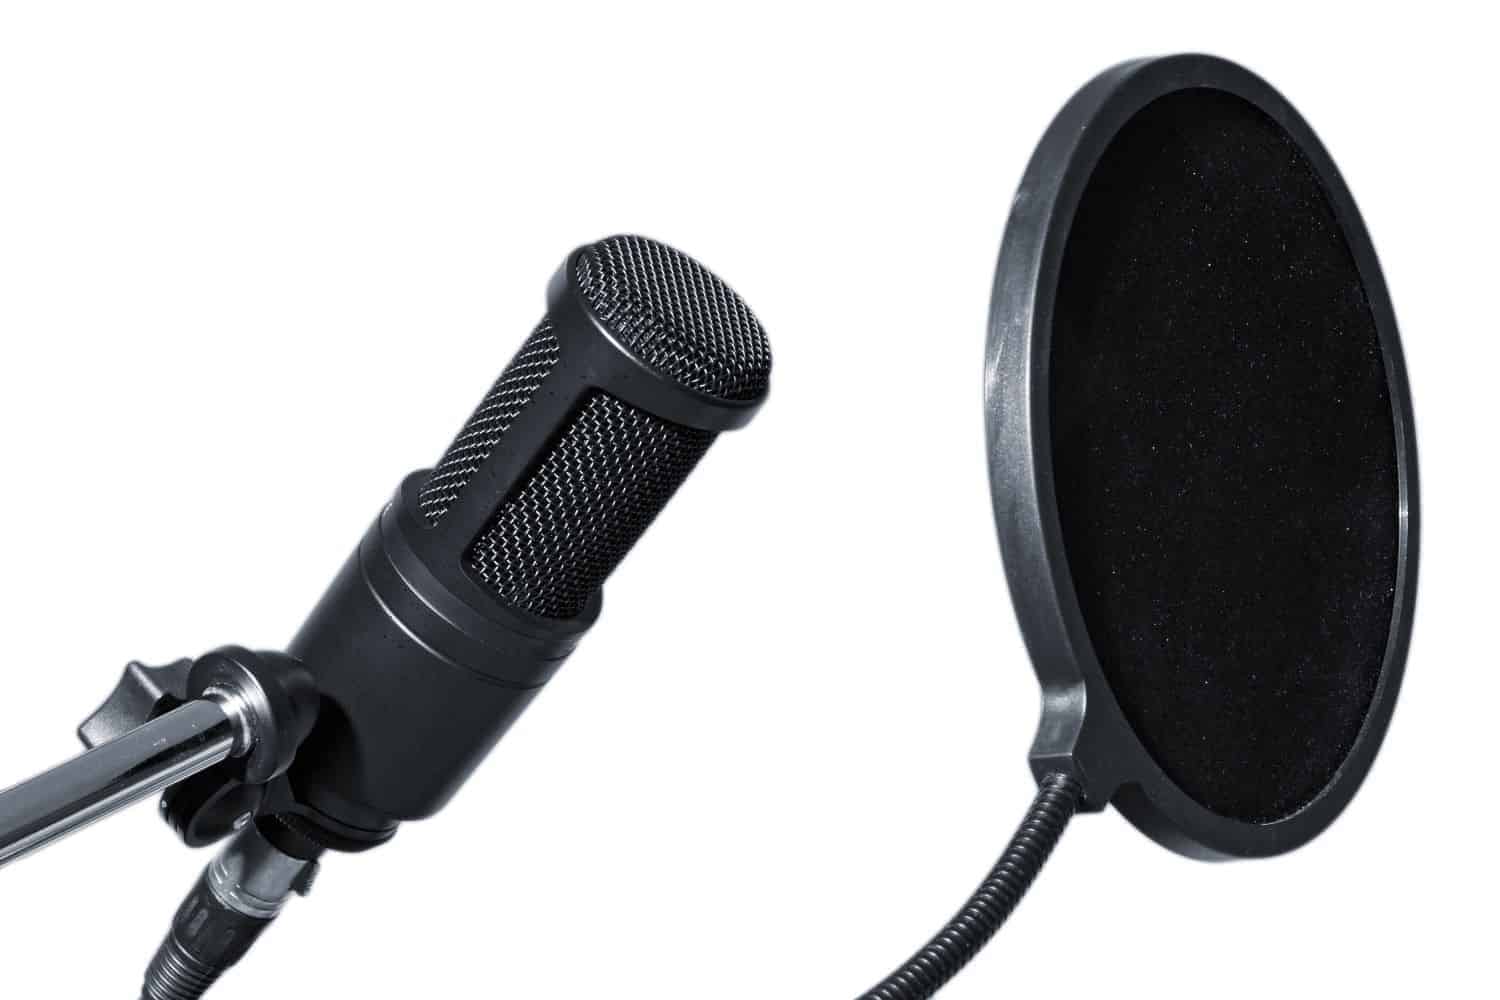
Plosives are consonant sounds that come with a pop when pronouncing the /p/, /t/, /k/, /b/, /d/ and /g/ sounds. They are one of the vocal issues that can turn an enjoyable podcast into an annoying experience. Having a pop filter helps reduce these noises greatly.
Pop filter

A pop filter helps to reduce or eliminate popping sounds.

Fix audio drifting by clapping at the start and at the end of your session

When recording multiple tracks -one per speaker-, you may find in the editing stage that one track plays faster than the others. This is called audio drifting and happens when one track has been recorded at different settings from the rest. A super easy way of fixing this issue is to clap at the beginning and at the end of the recording session. This will mark the points to fix audio drifting issues when editing.

When recording over Skype or Zoom, ask the guest to record themselves in a separate track

It’s good practice to have one track per speaker anyway but over the internet it’s crucial. Recording your guest over the internet will result in low bitrate issues, as well as connection drops. Having the guest record themselves will mean both tracks will have the best possible quality as well as making it trivial to delete retakes due to connection problems.

Use headphones when performing interviews over Skype or Zoom

By wearing headphones, as opposed to using speakers, your microphone won’t pick up the voice from your guest and vice-versa. Doing so will avoid echoes and unwanted pickup. As with echoes in your room, echoes over Skype can be equally problematic and hard to remove as computers will amplify the signal.
podcast online interview
Using headphones will reduce the background noise when recording.

Use an external mic to avoid unwanted pickup

Using an external mic instead of the one embedded in the laptop will help the speaker to stay close to the mic and avoid their voice being drowned by unwanted background noises. Additionally, as the microphone on your laptop is encased in the same space as your keyboard, any keypresses or bumps, etc will drown the voice and will complicate the editing process. Also bear in mind that most external microphones have ways of absorbing shockwaves that could happen for example from hitting the table, which your laptop may not be prepared to dampen.

Keep the mic in the same position when recording ambience

Having a short recording of the room in silence comes in very handy during the editing process. Each and every room has a constant background noise -ambient noise-, very subtle, and specific to each room. If you were to delete or mute parts of the recording you would hear jumps between the dead silence of the deleted parts and the vocals with this ambient noise. To avoid this, during editing, it’s better to paste ambient noise on top of the areas to be “deleted” instead. Just make sure that the recording of the ambience is done by the same mic on the same position you’ll be recording the voice later on. A good practice is to record 10 to 20 seconds of silence before you begin your recording, or leave it recording for the same amount when you are done with the session.

Record in high resolution

There are going to be multiple stages of importing and exporting files during the editing process. With each step some quality will be sacrificed, especially when exporting to MP3s. Starting from the best possible source will help bring the quality up even at the last stage. Depending on what you are aiming for formats like WAV or AIFF at 16-bit, 44.1 kHz should be more than enough for house recording. If you go to a recording studio and want a professional recording, you can look into 24bits, 48kHz.

Record multiple takes

Editing is like magic, we can take out that bad delivery and replace it with a good delivery. The only catch? You need to provide the good delivery yourself. Let’s say you’ve done an interview, everything went well, you shake hands, the guest leaves and you sit down to prepare the files to send out to editing when you find out that your delivery in some of the questions weren’t as good as you thought. What do you do? Well, that’s easy, record yourself again asking the questions even if the guest is long gone. As long as you record them in the same space with the same microphone, editing them in is trivial!

Record in Mono (Most of the Time)

The main reason to use stereo is to enhance performances where positions from speakers matter, like in a dramatization or NPR. In most podcasts though, mono is recommended because you want to hear both the hosts and guests in equal manner. This has the added bonus that it does cut on file size as well.

Aim for short Intros and long outros

Getting to the point quickly is key to grab the attention of the audience before they tune out and switch to another podcast. That’s why a quick introduction to the topic and then segue directly intro the body of the discussion is a good idea. Outros on the other hand can be longer, you’ll want to explain how your audience can contact you or find you online as well.

Expert Opinion:

Stephanie Murphy, PhD, Voice Actor:
When you are recording a podcast intro, it can feel overwhelming. What should you say? Don’t overthink it, and don’t get too verbose – the purpose of a podcast intro is to get your listeners excited for what’s coming next. It’s like the smallest appetizer, and your podcast content is the main course! Remember, loyal listeners of your show are going to end up hearing your intro dozens, or even hundreds of times. So keep it short and sweet. Challenge yourself to create an intro that’s 10 seconds or less. If you can be funny, unique, or otherwise memorable within that time, that’s a bonus!

Preparation & Assembly Tips

2 preparation assembly tips

Compile all the files in one place before you start the editing process

Noone likes starting a project that can’t be finished, so make sure you have all the necessary files before you load up your DAW -Digital Audio Workstation- to avoid wasting time. And by this we mean, compile all of them in one folder and play them too. It wouldn’t be the first time we sit down to edit only to find out too late one of the files is 40 minutes of silence.

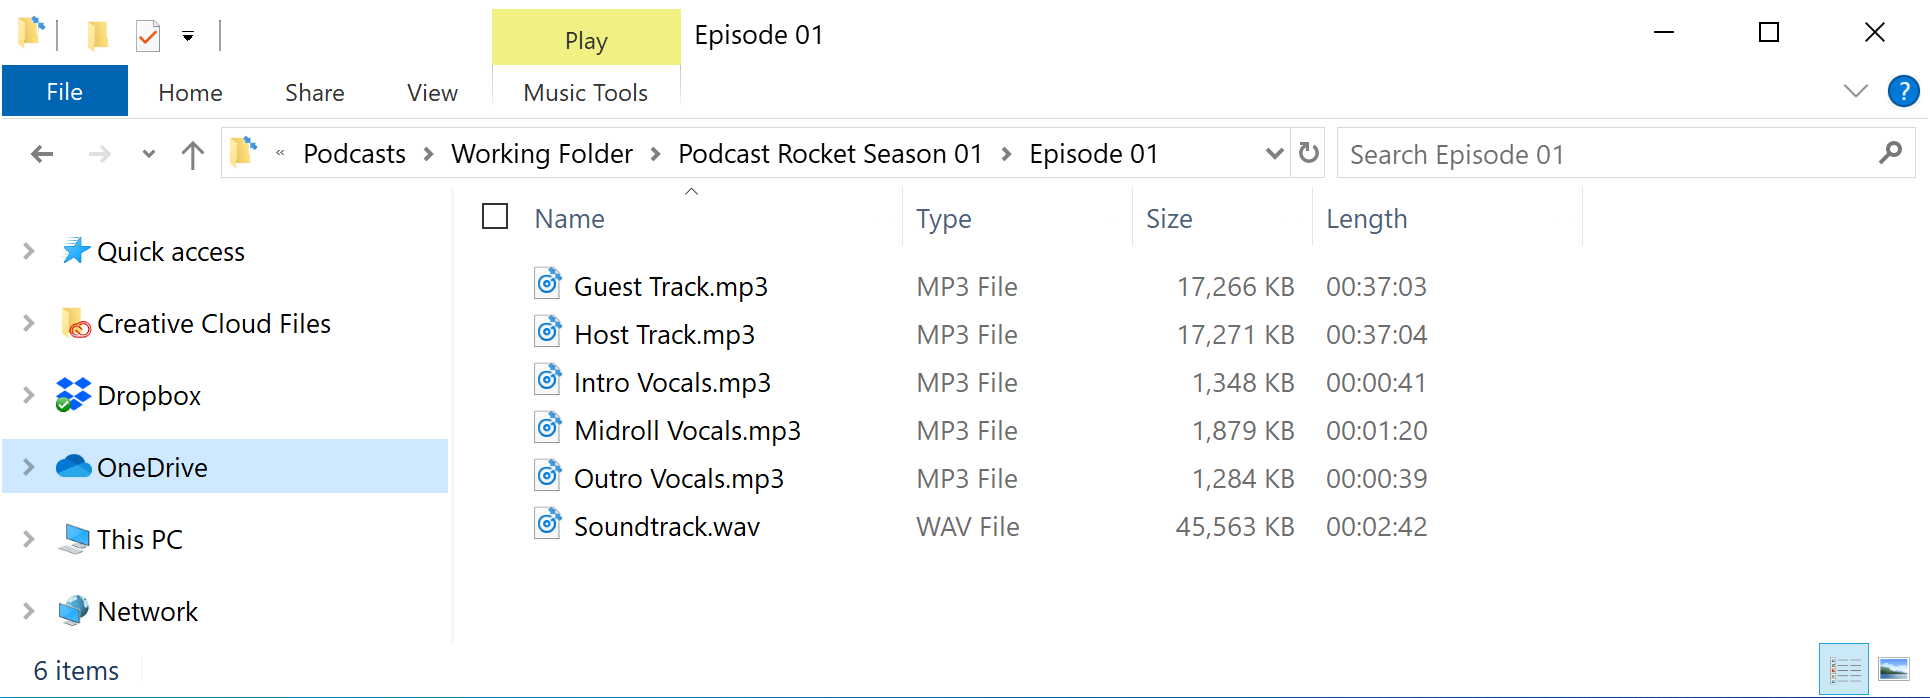
Use consistent file and folder name structure

Rename all files and folders before importing them into your DAW. It will help you setup a process and make things easier to find and identify later on. A good rule of thumb is to ask yourself if you would be able to tell where and what the purpose of each file and folder is if you were to find them in 6 months. Not only it helps with working in a team but also when a client contacts you out of the blue about an edit they want done that pertains to a three month old episode.
podcast files organised
Good organisation makes editing future episodes more efficient.

Backup all the files before, during and after editing

There is nothing more nerve-racking than a computer that won’t turn on just before the deadline of a delivery you’ve been working on for hours. So it’s good practice to backup your files before, during and after you are done editing – highly recommend you do this on the cloud! Having a copy is also helpful when you are in the later stages and want to compare how much of a difference the mixing and mastering are doing. You can drop the raw file in different track inside your DAW and compare the before and after.

Keep an eye on warping when importing files

Depending on your DAW, you’ll have to be careful when importing files into your newly created project as some file warping may occur to the tempo or levels. No, the software doesn’t want to make things harder for you, the DAWs are actually trying to do the opposite and help you out. Unfortunately most of the time they’ll apply changes that would only apply to music and not podcasting. So once you’ve imported your files into your software of choice, have a look for any warping that may have happened. For better control later on, you’ll want to start working with a setup that mimics the original file.

Double check file starting positions when importing tracks

Again, depending on your DAW you may have to verify the starting positions of the imported files as some apps will cut the beginning of the tracks by default to save you time. Little does the software know that sometimes they cut off crucial parts of the conversation as these are cut out using a threshold value, and that value may – will – not be set to pick up soft spoken guests on a long distance call. Even if the beginning of the track is mostly silence, you’ll want to align it to the real start to avoid any syncing issues between tracks and most of the time you’ll be able to extract some ambient noise from it.

Place each speaker on its own track

Once you have all the files imported into your DAW, assign each speaker one track and place all their files on that single track. That includes intro/outro vocals, their part of the body of the episode, any adverts, etc. (There is one exception to this rule: ignore this rule if they’ve changed microphones since they recorded the intro/outro and/or adverts.) This setup will make it easier to mix per speaker later on. Any music and sound effects will also go into different tracks for the same reason.

Organise the tracks

Whatever your way of editing, find a way of keeping everything organised when importing all the tracks. Use colors, names and tags and any other functionality your DAW provides to keep everything organised. Do this especially if you are dealing with a large number of tracks and files, but it’s important for all types of projects as it will save you time in the future.
tags colours tracks organized ableton live3
Clearly named host and music tracks have each area represented with a tag and a color.

Save the organised file as a template

All episodes in a show will follow the same pattern so you can save a lot of time by taking the time to assemble and organise your first episode as an example. Once you have a template, you’ll be able to easily swap the files with new content for each episode that needs editing later on, making your future assembly process a breeze.

Learn the terminology

It will help you when googling, asking questions or talking to your peers. Sitting down and reading a bunch of terms in one go will not help you but do make an effort to research a topic in depth when you come across something new. It will be hard work at first but will pay off in the long run.

Use the right software for the task at hand

Go and research you favourite DAW and Audio editors and compare them. DAWs offer multi-track and non-destructive editing functionality which is crucial for audio editing. These features make our lives easier and raise the production value. Audio editors on the other hand don’t support these features but still are very useful in other contexts, especially if you want to edit a single track or take advantage of a specific feature your DAW of choice doesn’t support.

Related: The 11 Best Podcast Editing Software For a Perfect Show

Editing Tips

3 editing tips

Edit before you mix

Editing is key to avoid making a bad podcast. Nowadays it’s easy to do all at once with the power of DAWs but you’ll have a much easier time if you focus on editing first, mixing second. The reasoning behind it is that once you start playing with automations, it will be harder to match the cadence when editing out parts of the recording. Better to have the flow and rhythm of the episode down before you go onto making it sound good.

Learn the key combinations in your DAW

This is just good practice on any software that you use regularly, key presses are faster than shifting through menus to find the right option. It will be slow at first but will save you a lot of time in the long run.

Add fades to the tops and tails of each clip that has abrupt entrances
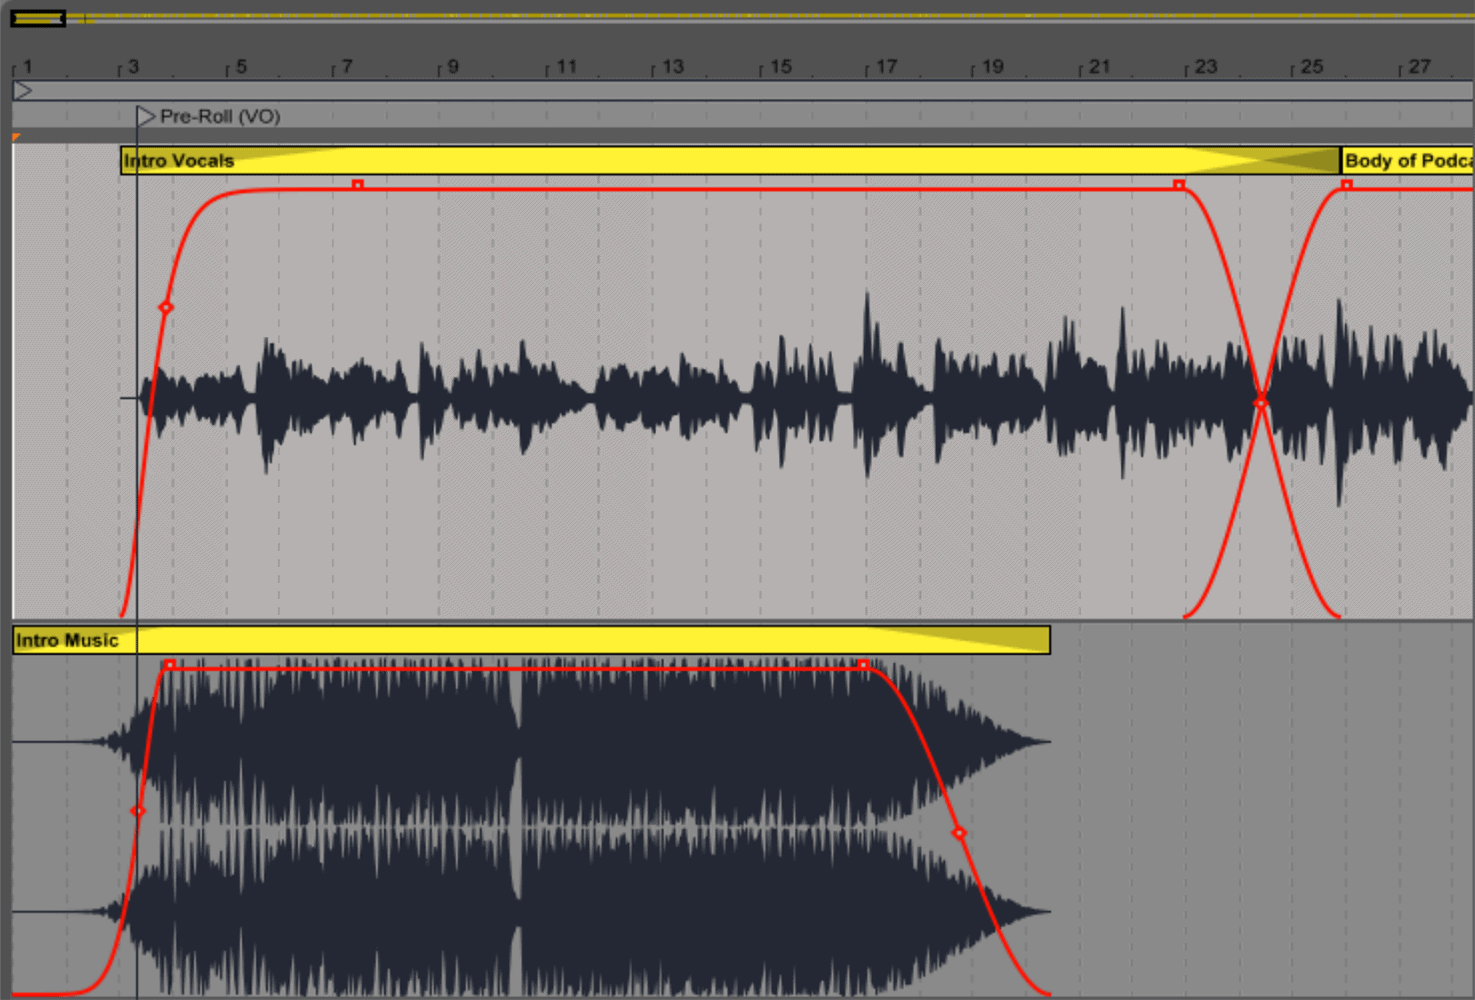
There is nothing more distracting than having harsh cuts between clips. It’s an easy fix though, just make sure your clips follow the natural flow of voice by fading into and out of speaking.
fades tops tails clips ableton live
Fades to the tops and tails of the host and music clips.

Play the track at twice the speed when hunting for filler words

During the editing session there is no need to play through the whole recording at normal speed, you can speed up the recording and still hear the ums, uhs, other filler words, awkward pauses, false starts and interruptions. It may seem like an impossible feat but after a couple of times this becomes second nature and will save you a great deal of time during future editing sessions.

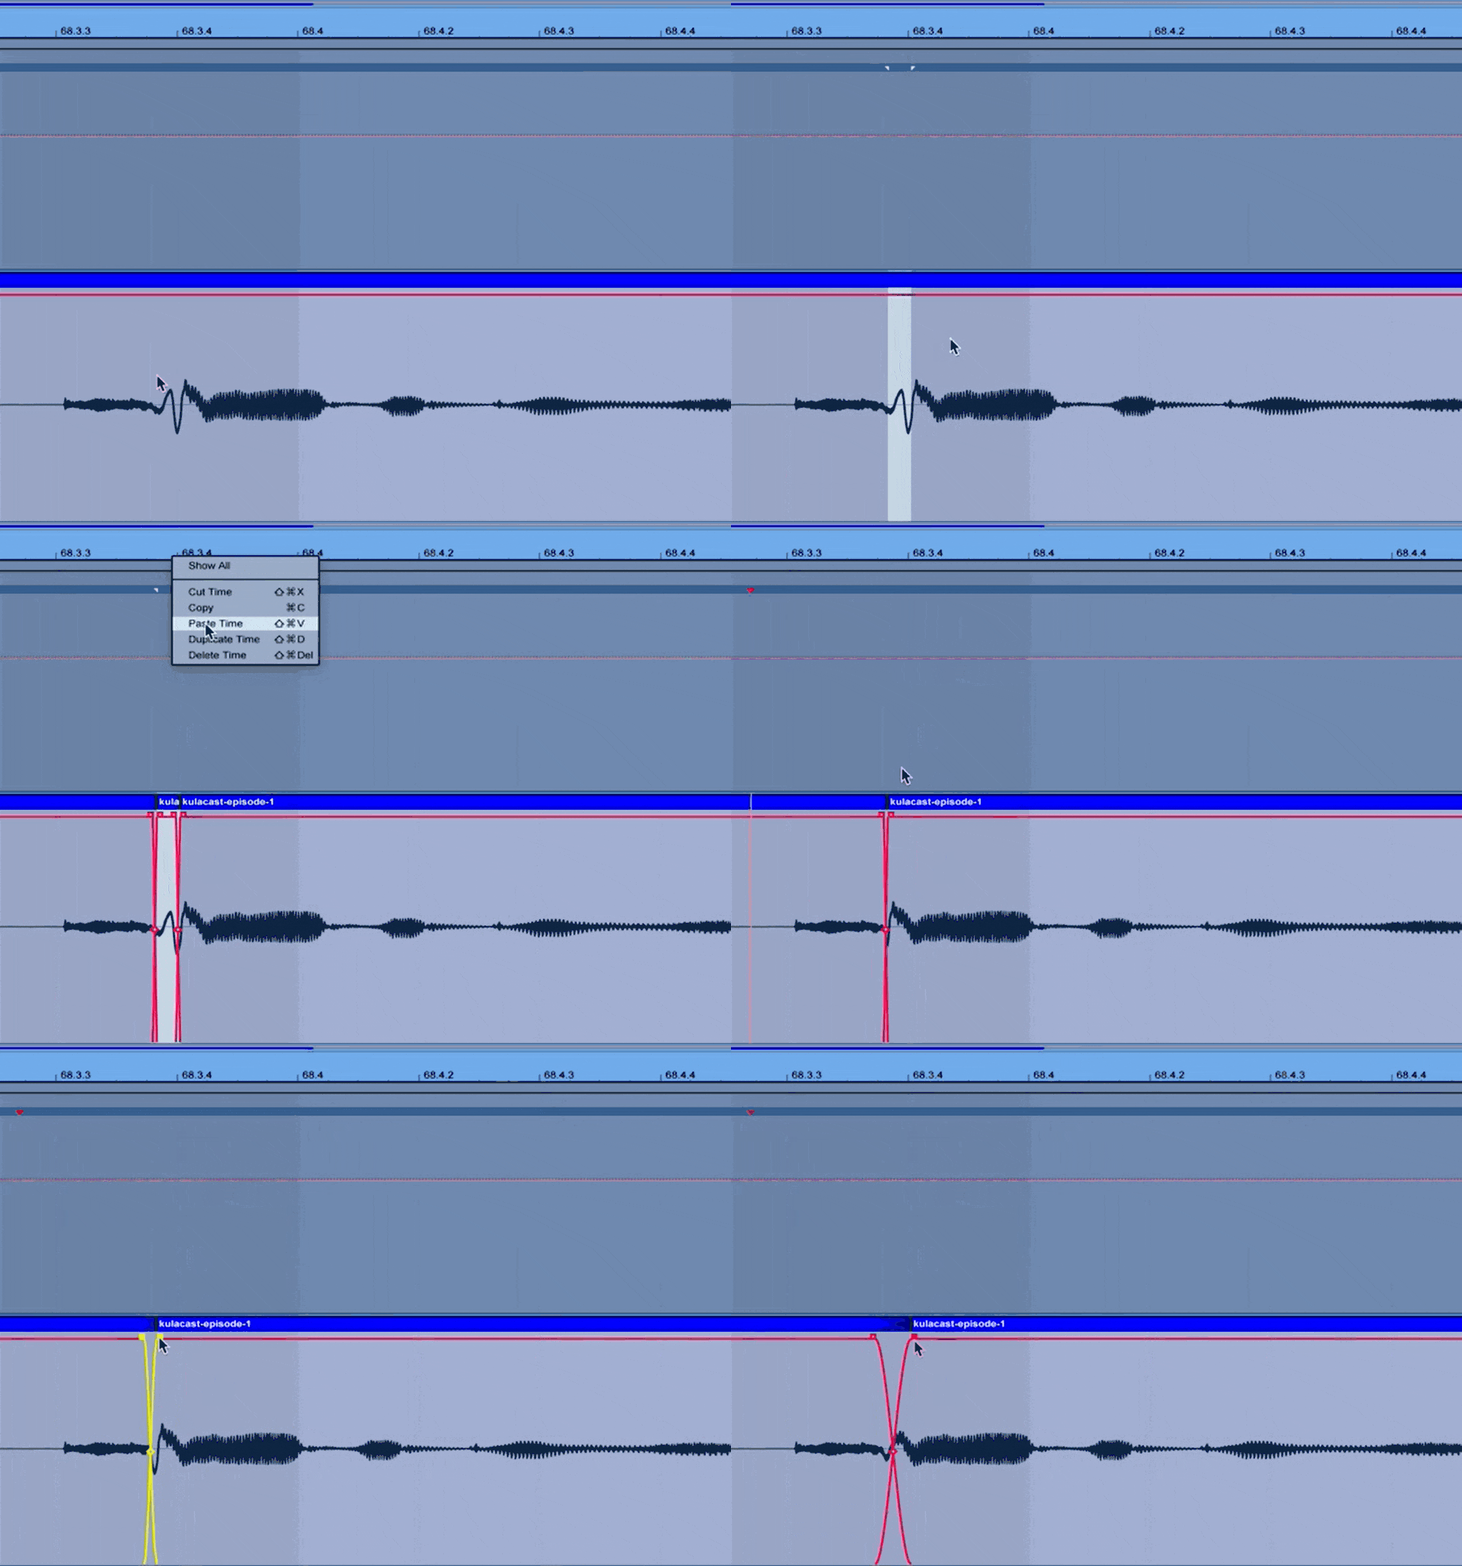
Delete filler words and interpolate

To remove filler words like “uhm”, “uh’s” etc, delete them and interpolate the waveform. This helps keep the natural flow of speech and your listeners will be none the wiser.
remove filler words ableton live
Example in Ableton Live on how to remove a filler word by deleting the time and healing the signal.

Don’t remove pronounced breaths, fade them out instead

Removing breaths, no matter how annoying they are, makes the podcast feel artificial. The speakers suddenly never breathe and it may speed up the delivery too much. Instead, consider fading the breaths out to a whisper to keep the conversation natural. That is, unless they are very problematic, in that case check the next tip. If a breath is too long or erratic, consider changing it for another less pronounced or shorter from another place in the episode.

Tighten up natural pauses and breaths for a better delivery

Sometimes the speaker will take extra pauses and breaths as they think on the next thought. You can remove these breaths or pauses entirely if they are dragging the session down or the delivery is not as snappy as required – especially during the intro to an episode. You’ll know when to do this when you feel the speaker is struggling to get their point across. Just be careful not to over do it or it will sound unnatural.

Add a “beat” between vocal cadence changes to reset the ear

Sometimes when editing you will find yourself removing part of a speech that didn’t quite work and find yourself with a change in cadence. The speaker started very excited and then returned to a lower slower rhythm while delivering the speech for example. This is a problem because removing the middle part will create an ugly jump in the excitement of the voice. To address this issue, you can add a “beat” like silence or music to reset the listener’s ear. If you add a silence, the listener will assume the speaker paused for emphasis or thinking and will feel natural. And music or playing a sound effect is a good way to segue between thoughts in audio editing too.

Let the hosts ramble to avoid abrupt cadence changes

There are other times when you want to edit out a part of the speech but you run into the same problem as the previous tip with the cadence changes. In some situations there is no “good” way of handling it in a way that will sound natural. In these situations just bite the bullet and let them ramble for a bit and find a later point where to cut to keep the podcast flowing naturally. A noticeable cut is much more distracting to the ear than letting the speaker talk for a bit longer.

Use an ambiance clip for silences and flow “beats”

Remember that short piece of ambience noise you recorded during the recording tips? Well, a short clip of ambience can be used to delete words and can also be used between two vocal clips to avoid abrupt interruptions or changes. Combining this with fades will help it blend in and sound natural.

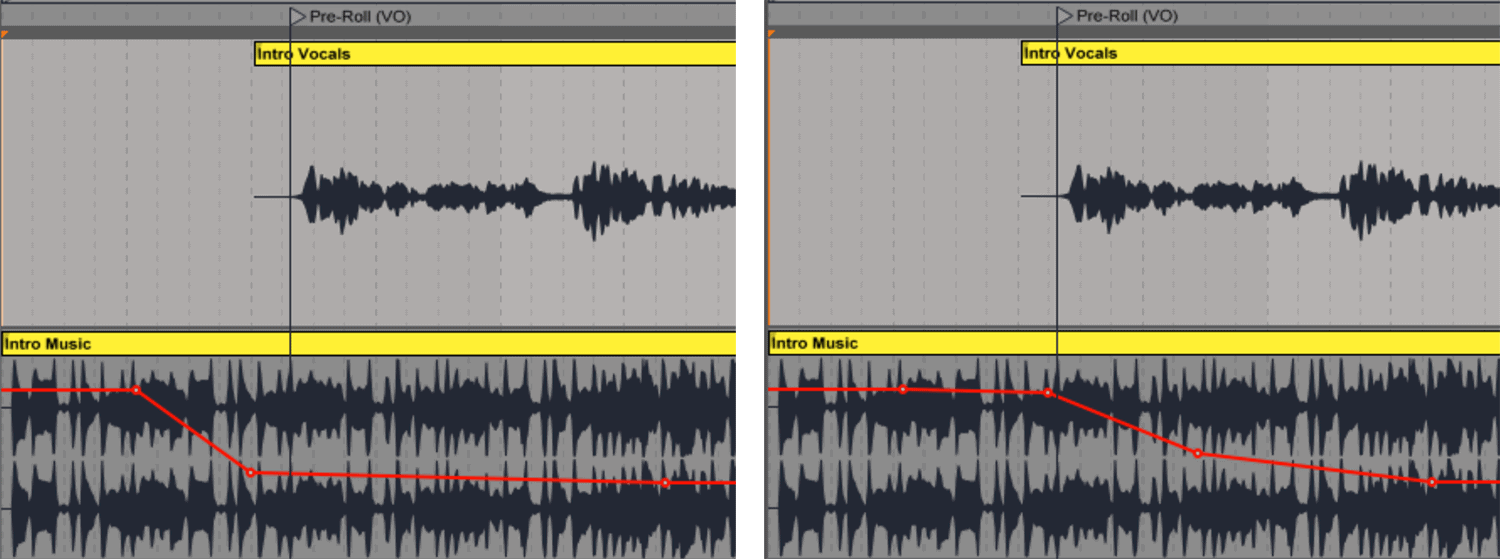
Tuck music fades behind content

Bad fading can break the immersion in your podcast by bringing too much attention to itself. Instead of fading out before the content starts, consider fading out as the content fades in for a more natural transition.
bad fade good fade ableton live
On the left, a fade that is too early. On the right,the fade comes in with the voice.

Use a long crossfade when connecting two pieces of audio with different background sounds

When editing parts with background sounds that can’t be removed, it may be tricky to avoid a cut. Think a dog barking in the background in one clip vs another one with a baby crying. Even if the cut in the speech is natural, the background cut will give the trick away and be distracting. In these cases, use a long crossfade to make it seem like the dog stopped barking and the baby starts crying.

Use Strip Silence to easily see where conversations overlap

Strip Silence is a built-in feature in most DAWs that will detect regions with silence or close to silence and mute those areas. It’s also a good way to catch false starts and overlaps by looking at the tracks once you’ve used it, making it much easier to spot multiple speakers talking over each other. Depending on the ambient you may want to revert this once you’ve seen when the next collision has happened. Alternatively you can keep the muted areas and add the ambient yourself in a different track to avoid jumps between the silence and the speakers’ background noise.

Untangle multiple speakers talking over each other

Once you’ve spotted the areas where multiple speakers talk over each other providing different views, it’s easy to place one thought after the next sequentially if they are on separate tracks. This allows for a better flow of the episode as well as bringing clarity to all points of view addressed.

Remove apologies, false starts and phrase restarts

In order to keep the flow of the podcast engaging, it’s better to remove false starts and phrase restarts. When moving blocks of audio around to avoid collisions, it’s good practice to also remove the apologies or stumbles that happen when talking over another person. It will streamline the production and it will flow better. If done right, your listeners will not even know that these points of view were expressed over each other.

Edit out the agreeable speaker

We all know someone that is great to talk to when you are having a conversation in a normal day to day setting. These people tend to agree – say “yes” & “uh-huh” – every now and then to let the other party know they are engaged in the conversation. In podcasting, though, they get tiresome very quickly. If you have an avid agreeable speaker, remove most of their interjections to improve the flow and let the other speaker express their views freely.

Edit on the consonant

When removing false starts, stutters, repeats, etc you’ll find yourself in situations where you can’t remove them entirely without cadence or voice changes. In those situations it’s better to find a consonant like an “s” and cut there. It will sound more natural than if you were to cut on silence.
Javier Mercedes explains how to edit on the consonant.

Delete background noises during silences

Treat background noises during a silence like unwanted pieces of voice and delete them. It may sound trivial but leaving a noise during a silence will bring the listener out of the experience and that’s what editing is all about, keeping the listener engaged with the content. A bump or clash between words will lose the listener in thought instead of focusing on the words. As you would with any other crutch words, make sure to mix the track to match ambience levels when deleting. If you’ve used Strip Silence then it should be fine to straight up delete it.

Drop the source file into a separate track for reference

Duplicating a raw file on a different track is an easy way of comparing your edits with the source material. It’s especially useful when looking for flow improvements. Listening to the original file and then the edited one will reset your ear to any areas that may need more work.

Time stretch the longest file(s) to fix audio drifting

Audio drift issues can be fixed by finding two syncing points at the start and the end of all tracks and time stretching the longest tracks to match the shortest. This is why clapping at the start and at the end of the recording is such a life hack because it becomes trivial to sync all tracks by scaling them to the reference points created by the claps.

Watch out not to disrupt speech flow

Be mindful of not upsetting the speech rhythm when editing audio out. This skill develops over time but always aim to keep conversations sounding natural when editing. You want to keep a short silence between each speaker during a topic, have longer breaks when changing topics and watch out for complex areas where multiple people talk to keep the flow fresh and interesting.

Long list of cuts? Edit in reverse

Let’s say you are handed a list of 50 cuts with corresponding timestamps for an episode. How would you go about it? Once you cut the first one, you’ll have to adjust every other timestamp by the length of the cut. For example, let’s say you need to cut 5 minutes from the start. The next timestamp in the list will need to be whatever it is minus 5 minutes. The more cuts you make the harder it gets to know where the next cut should happen. Solution? Start at the end of the list and make your way to the start. That way you ensure your list of timestamps remains unchanged no matter how many cuts you’ve made.
– 07:14:05-07:14:21 -> delete page turning sound
– 07:37:07-07:37:18 -> cut cough
– 08:32:13-08:33:12 -> cut
– 11:08:20-11:08:26 -> delete page turning sound
– 13:26:17-13:31:23 -> cut stuttering
– 13:33:19-13:34:16 -> cut
– 16:17:20-16:20:12 -> cut
– 16:57:18-16:59:03 -> cut
– 18:43:05-19:02:00 -> cut stuttering
– 19:04:00-19:04:20 -> cut
– 19:08:05-19:10:00 -> cut
– 19:12:00-19:14:07 -> cut stuttering
– 19:18:20-19:44:20 -> cut rambling
– 21:46:09-21:47:00 -> cut
It is harder to keep track of a long list of edits if you don’t start from the end.

Mixing Tips

4 mixing tips

Use a high-pass filter to remove low-end rumble plosives

Plosives can put your listeners off if they are very pronounced. You can tame low-end rumble plosives with a high-pass filter or a low shelving EQ over the offending parts. A steep roll off of all frequencies below 100 to 150 Hz over the whole track will soften plosives without risk of affecting the vocals too much.

Target most difficult plosives explicitly

On the cases where a high-pass filter won’t do the trick, you have a couple of ways of dealing with plosives but all rely on hunting them down and fixing each one separately. One way is to use a steep roll off like you did on the tip before but only around the plosive and do it aggressively for all frequencies below 200 to 300 Hz. Another way is to delete the main part of the plosive and shuffle the edit together. And finally, sometimes your DAW may have a specific tool to deal with these.

Use a tool to smooth out distortion

Distortion normally happens because the levels of the recording have exceeded the maximum value that can be saved to file. These values can’t be recovered as they were never saved, but there are plugins and other pieces of software that can help out smoothing out the wave and make it sound better. Some examples of great tools that can help with distortion are iZotope’s RX, Clip Fix in Audacity or the fix tools in Adobe Audition.
Kevin from Sonovert explains how to smooth out distortion.

Audio restoration software is great for removing hiss

Sometimes you get a hiss in the background that adds to the overall background noise. Maybe the recorded track levels are too low, maybe there is some static from the equipment, whatever it is, if it’s consistent and affecting the whole production, you can use restoration software to remove it. iZotope RX, Acon Digital Restoration Suite, or Sonnox Restore are some examples of audio restoration software.

“De-reverb” tools can help with echoes

When it comes down to most of these issues, prevention is key. But if you find yourself in need of taming echoes, there are “de-reverb” tools that can help with the issue. Just be careful as these tools will chip away from the vocals so it’s always a balance between removing the echo entirely and maintaining a high quality production from the speakers.
Mike Russell explains how to remove echoes with a DeReverb tool.

Reduce sibilance by using a “de-esser”

A de-esser plugin is the easiest way of reducing the amount of sibilance in any recording. They normally act as a side-chain compressor to the high-mid frequencies to act on the harsher sibilant parts of your recording. There are two types: split-band and wide-band de-essing. Split-band will dull the sibilance by reducing the high level frequencies. Wide-band will turn down the entire vocal track when a sibilant sound crosses a threshold. Experiment with both and pick your favourite which will depend on your taste and it’s mostly a personal choice.

Reduce Sibilance with a volume envelope

There are many ways of reducing sibilance, but for best results reduce sibilance manually by adding a volume envelope around each offending part and reducing the volume by 5-10 dB. This method gives you much more control as you attack the specific places where sibilance is more pronounced. The drawback is that it’s much more time consuming.

Mouth noise can be reduced with tools

It’s not uncommon for listeners to be put off by smacks of lips and saliva noises. These clicks and pops that almost all humans make before or after speaking are intensified on recordings as the mouth is so close to the microphone. There are tools that can help soften these, for example the DeClicker plugin or the Spectral Repair in Izotope can help reduce mouth noise.

Enhance the message with music. Not the other way around

Adjust the volume of the music to be able to hear the speaker. If podcasting were a soup, the content would be the broth, the most important part of the experience. Listeners don’t come for the music, they come for the content. Make sure the audio levels match that expectation. A rookie mistake would be to do the opposite and drown the message in music. An easy way to place voice within music is by using the envelope tool in your DAW and make sure you can listen to all the words being said.

Rough in the levels of all tracks before Equalising

Equalising – or EQ – will affect the levels. So roughing in the levels of all tracks before you EQ will make sure you have everything normalised. If you were to EQ before doing this step you would have to fiddle with each individual track afterwards to get the right output. This step will save you time getting to a more cohesive experience.

Adjust levels by sentences, not words

There will be exceptions of course where you will need to adjust sudden bursts of energy but in general, you want to adjust the levels by entire sentences or phrases as it will sound more natural.

Most of the low frequencies can be cut when EQing
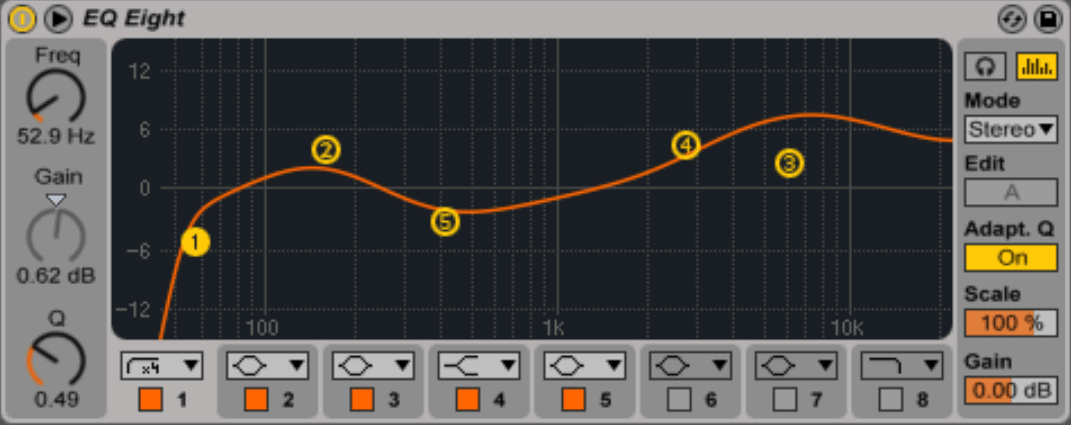
Most voices don’t generate fundamental frequencies below 85Hz so adding a sharp cliff on the first band is a quick way of removing unwanted rumbles or plosives. Depending on the voice, though, you may want to leave some frequencies above 50 Hz to keep the voice intact.
eq low freq cut off ableton live
In this example, frequencies lower than 52.9 Hz are being cut off to avoid background noise. A gain in the 153 Hz for warmth and a shelf in the 6kHz range for clarity.

A gain around 120 HZ will give your speakers more warmth

When a voice sounds thin, you can raise a parametric EQ by 4 to 5 db and sweep through the 80 to 200Hz region hunting for that spot where the voice stops sounding “flat”. Just be careful not to over do it or your audio will sound tubby. Going higher into the 200 – 350 Hz range will make the voice sound more nasal or chesty which most most of the time is an undesired effect. But sometimes you’ll come across voices that actually benefit from a boost around this region too so never say never.

Shelving higher up frequencies will give your speakers’ voice more clarity

Clarity is mainly found in the upper mid-range frequencies. Men are typically in the 150 to 6,000 Hz and women are in the 350 to 8,000 Hz range. A 3 to 4 dB gain, in these frequencies will help with speech intelligibility.

A relatively fast attack and release will sound more natural for voice recordings

The combination of fast attack and fast release mimics how humans speak. Attack refers to the amount of time until the signal becomes fully compressed once it’s gone over the threshold. Release is the opposite, the time it takes for the signal to come back to the original state. Humans tend to talk louder suddenly and then go back to normal also quite quickly. Good values to look for are: 5-20ms for the attack and no longer than 500 ms for the release. Don’t be afraid to set the release time to auto, it will tend to sound good on voice.

Setting a lookahead time to the compressor will smooth out transients
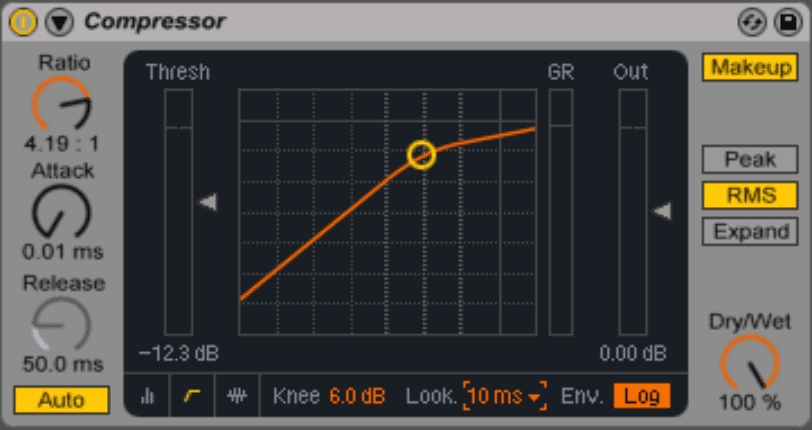
Transients are sudden changes in the signal, normally because the speaker raises their voice for a second. Setting a lookahead time to around 10ms will allow the compressor to prevent transients from passing through and therefore clipping from occurring.
compressor 10ms lookahead ableton live
An example compressor with a lookahead time of 10 ms.

Balance the host track first

When fine tuning the levels of all tracks – what is normally known as balancing – work on the main track’s levels first. This will give you a foundation to work with. Then match the levels of the other tracks to the main track. The main track will be different depending on what type of podcast you run but it’s normally the host’s or presenter’s track.

When the volume is too low, a combination of EQing and background noise reduction may help

Prevention is key, but if you are stuck in a situation where the episode was recorded at a low volume, background noise reduction will help with the hissing and the EQing will help bring out the voice as it always affects the levels.

Use a high pass filter to help with muddy tone or EQ issues due to Skype or other voice over IP (VoIP) connections

Described as muffled, “bassy” or tubby, muddy audio is normally a symptom of low bit rate issues. Too much low-frequency sound or a lack of high frequencies can be improved with a high pass filter.

Bright tone or EQ issues due to Skype or other VoIP connections can be attenuated with a “high shelf” or “low shelf”

Tiny, trebly or thin are other names for bright audio and it’s normally another symptom of low bit rate issues. Too much high frequency sound can be fixed with a “high shelf” applied over the high frequencies. Alternatively you can play with a “low shelf” over the low frequencies.

Stereo balance issues can be fixed by using only one channel

The idea is simple, if you are hearing more from one channel than the other, just use that one channel – this is called “pulling left” or “pulling right” depending on which channel you want to keep – on both left and right channels, essentially converting the audio file into mono and therefore fixing the issue. 
Tux designer goes over how to fix stereo channel issues.

Alternatively, stereo balance issues can be fixed by panning the left and right channels

If the issue is that the image is off-center – one of the two channels is coming through louder than the other – the solution may be to play with the panning of each track until they both come through equally. A simple trick is to swap between mono and stereo and adjust until it sounds that both channels are equally levelled. This is normally a symptom of faulty equipment or an asymmetrical recording room so even though this issue can be fixed in the mixing stage, the problem should be fixed at the recording level.

Background noise can be attenuated with noise reduction software

Background noise that happens during the silences is easy to remove but what about when the noise is audible behind the speaker? There is a plethora of tools that can help with noise reduction and range from free to hundreds of thousands of dollars. Tools like Audacity, Accusonus ERA, Antares SoundSoap or iZotope RX to cite some examples can work wonders at removing background noise. Just make sure not to go overboard as the vocals will be affected. That’s why fixing this at the recording level is the best solution.

Artifacts deriving from low bit rate audio can be softened with EQing and noise reduction tools

Often recordings over Zoom, Skype or other VoIP connections suffer from low bit rate audio issues that can manifest as artifacts like hits, ticks and pops. Noise reduction tools as well as applying some EQ may be able to soften these. Tools like iZotope or X-Crackle and X-Noise by Waves can clean up the pops and click although sometimes a low pass can be enough to tame the most accentuated artifacts.

Trust your ears

There comes a point in during audio editing where you need to close your eyes and listen. It becomes second nature to play with the lines in your DAW day in and day out but sometimes the visual wavelength will tell you one story but your ears another. Don’t forget: always trust your hearing over your sight when editing audio.
trust your ears 1
Your ears don’t lie.

Find which frequencies are messing your recording by boosting first

Sometimes when mixing you will find an area that is particularly difficult. It will sound wrong but you won’t know why, which frequencies are acting up. Additive EQ – or boosting – will make the nasty frequencies pop out and it will be trivial to cut them out – applying subtractive EQ -.

Try boosting after compression for better control

It’s tempting to boost before compressing but compression will affect the output levels so you’ll find yourself playing with boosts after compression again. Instead consider this: Once you’ve cut the undesired frequencies and applied the compressor, it will feel more natural to boost the desired frequencies.

Determine the frequency range of the ‘ess’ sound by using a frequency analyzer

There are tools to check what the frequency range of the ‘ess’ sound is. This will come in handy to avoid boosting a voice past this range and making sibilance worse.

Boost the soul of the podcast

Depending on the mic used you’ll find yourself hunting for presence. A moderately wide Q and a boost of 3 to 6 dB around the 2-5k HZ will give the episode more presence. Just be careful with sibilance, don’t go overboard or you’ll find it rearing its ugly head. Use the previous tip to know how much you can push it.

Apply compression in layers

Compression is like painting: if you apply it all at once you get a big, gloppy mess. But if you apply it in layers, you get better coverage for a nicer finish. Consider adding compression to your tracks individually, then together during mastering. Each time concentrating on what each track needs.

Bring the vocals to the front of the mix with help from the compressor

Set the compressor threshold so that the gain reduction meter reads below 6 dB. Every situation is different, but vocals start to sound lifeless and over-compressed when compressing more than 6dB. A way to find the threshold value is to look at where the volume is highest – wherever the waveform peaks – and put a temporary threshold value below the peak. Then set a 3:1 ratio – which normally sets nicely with vocals – and adjust the threshold control until the gain-reduction meter indicates 4-6dB of reduction of the higher peaks. 
Kade Young from Collaborate Worship explains how to set a compressor for vocals.

Mastering Tips

5 mastering tips

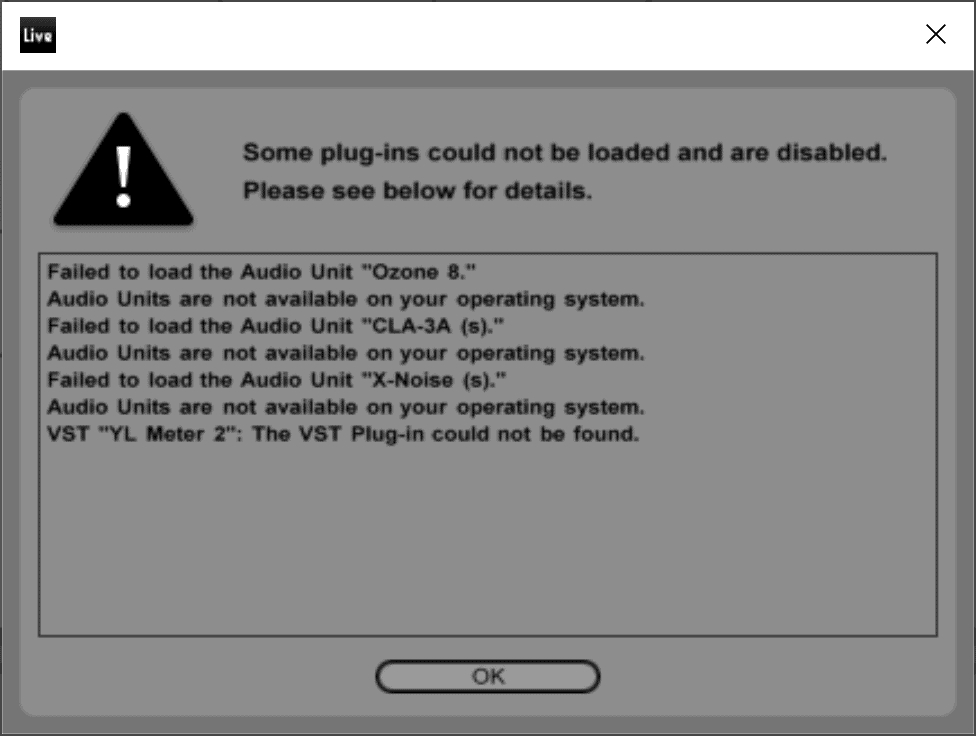
Use the same plugins across the team

If you are collaborating in podcast editing you’ll find that if you have inserted a plugin, your colleagues won’t be able to see it in the DAW file unless they have the same plugins. But it’s also crucial if you work within a group inside an enterprise like a business that the output is similar overall. Mastering will have a big impact on the “color” applied to the production so it stands to reason that you’ll want to standardize the plugin usage across peers.
missing plugins ableton live
Make sure to use the same plugins accros the team.

Add a limiter on the master channel before starting the edit to avoid distortion when exporting

During the whole post processing process you want to maintain as much control over the editing, mixing and Mastering as possible. Adding a limiter to the master channel will prevent distortion from happening when exporting the final product. Aim for a threshold of around -3dB or less and an output level just below 0 dB for best results.

Use headphones when Mastering

Editing, and to some extent mixing, can be done with the speakers. But when going into the finer details of the mastering process, you’ll need to wear headphones to really dive deep into the nuances that come during this last step.
Mastering 1
Taking your audio to distribution quality can only be achieved while wearing headphones.

If the production is too loud after EQing and Compression, add a utility tool to lower the volume

EQing can affect the loudness of the piece. If you find that the recording is too loud after EQing, you may want to add a utility tool to bring down the volume of the whole recording.

Use an utility to play with the volume in specific areas

An utility can be automated to lower or increase the volume on some parts of the recording where its louder. It may be that the host was closer to the mic at the beginning or end so we can go ahead and normalize the volume throughout the recording by targeting different areas.

Master Bus Processing has to be subtle

There are two schools of thought, those that prefer to do their master-buss processing as the last step, and those who prefer to do so from the beginning. Whatever you approach you take, make subtle but significant tweaks to the EQ, to “glue” the mix together with compression.

Apply compression across the master bus to provide cohesiveness

Choosing the type of compressor to use comes down to personal choice, but the results are the same: apply a similar sound across the production and “glue” your mix together. Some compressors provide presets for vocals which can be very handy as a starting point and from which their settings can be tweaked to get the desired results.

Aim for -16 LUFS for podcasts

Create a louder and fuller master by limiting the dynamic range and boosting the perceived overall level. Tools like iZotope’s Maximizer can do this for you. Apple and Google recommend -16 LUFS for podcasts and it’s become the industry standard to make sure your podcast is loud enough so your listeners can hear you well but still within comfortable levels. There are many tools that can help you measure this value, Youlean Loudness Meter is an example of one of them.

Or Aim for an RMS level around -16 to -12 dB

If LUFS is not your method of choice for measuring loudness and prefer to use RMS, you’ll have to watch out for two levels: RMS and Peak Level. Peak level is defined by the highest peaks within the signal while the RMS level on the other hand is the amount of energy over a period of time. A good peak level to aim for in podcasts is -1dB to avoid distortion. RMS on the other hand is a good indicator of how loud on average your podcast is going to sound and should be in the -16 to -12 dB range for comfortable but loud enough levels.

Final Stages & Exporting Tips

6 final stages exporting tips

Listen to the whole thing and make note of the places the recording stands out

These areas will need attention. Maybe there is some background noise that needs checking, maybe the conversational flow is interrupted. Maybe the overall loudness needs to be increased, or decreased. Whatever it is, you’ll need to listen to the whole thing and see where it needs a bit more work.

Back up the template and exported file

Nothing worse than losing all you work after hours of editing. Once you have the template, you’ll be able to edit the next episode in much less time. And you really want to look into backing up the files in the cloud for easy access by your clients and yourself in the future.

Get a second opinion

Sometimes you are so inside the work that you’ll need a second pair of ears to understand what is going on. Find a co-worker, someone from the field, or someone that you value their opinion to listen to your work and give you feedback.
Editing process
A second pair of ears will expose any problems in your work.

Fill in the metadata

This includes the author, podcast name, episode, date, etc. There is nothing worse than uploading a file to a podcast hosting site and discover the metadata is blank. It’s easy, it’s simple, just make sure not to skip this step so your listeners have all the information in one place.

Export your files to MPEG3 (MP3) or M4A/AAC

This will make sure to get that balance between sounding great and having a small file for your listeners to download. That’s why they are the standard for podcasting.

Pick the right bitrate exporting settings

Depending on your type of show you’ll want to pick a different balance between quality and download speed. If your show focuses pretty much exclusively around people talking around a table and the music is mostly used as a branding device to segue into the interview then your listeners will value the download speed more than a high quality export. A 96kbps mono file is still on the higher end of the quality spectrum while being smaller in size than a 128kbps stereo file which your listeners will prefer if your show centers on storytelling with a great deal of music and sound effects.

44.1kHz is the recommended sample rate for exporting

The sample rate is the number of samples per second, the higher the sample rate, the closer to the original quality. If the recording was done over a bad connection, cheap microphone, overly compressed file, you may not hear the difference between exporting at 44.1kHz or 22.05kHz. But as a general rule you’ll want to export at 44.1kHz as it’s CD quality, meaning it’s good enough, and small enough to share it. Any other sample rate out of these two though and you risk sounding like a chipmunk as some players will not sit well with non-standard sample rates.

Enable dither to prevent audio artifacts when exporting

Turning on dither with noise shaping when you export your audio will add low-level noise that can prevent audio artifacts from occurring, resulting in a smoother production.

Check your final file in a variety of stereo systems

Once you are happy with the episode make sure to play it on different devices on speakers and headphones, sometimes you find that the voice of a particular speaker is sensitive to changes like these and there is always time to play with the compression a bit. You wouldn’t want all that hard work to go to waste because you didn’t play it on your laptop and phone before uploading.
Multiple devices
Listen to your episode in at least two different stereo devices to ensure it’s high quality.

Host your episode in a different server to your website

Large media file downloads can bring your website speed down for the hours just after you release your episode. That’s why using a podcast hosting is the standard way to go in the podcasting community. Most of the podcast hostings also come with an easy way to embed your episode into your website with a streaming player widget which makes publishing a new episode easy.

Make sure your podcast hosting service supports byte serving

All episodes, XML, and artwork have to be hosted on publicly addressable servers with byte-range requests enabled to work on Apple podcasts and other portable devices. This allows users to stream the episodes as opposed to having to download the entire file.

Conclusion

That’s quite a list.

Now I’d like to hear from you:

What’s your favourite tip on this list?

Or maybe I missed one of your favorite tips.

Either way, let me know by leaving a comment below.

Subscribe
Notify of
guest
4 Comments
Oldest
Newest Most Voted
Inline Feedbacks
View all comments
Redacted
Redacted
4 years ago

Great content! Super high-quality! Keep it up! 🙂

JamesLet
JamesLet
4 years ago

Many thanks, this website is extremely valuable.

Redacted 1
Redacted 1
2 years ago

For the first dialogue in a podcast, should we skip a beat to give listeners one second to focus so that the podcast doesn’t dive into a statement five frames into the recording? Thanks!

Comments are not available for this post.