As a podcaster, there may come a time when you need to fade out your audio. Maybe you’re ending the episode, or maybe you’re transitioning to a commercial break. In any case, learning how to fade out in GarageBand is an essential skill that every podcaster should know.
In this step-by-step guide, we’ll show you how to fade out your music in GarageBand like a pro. So whether you’re an experienced musician or just starting out, read on for all the tips and tricks you need to create smooth, seamless fades every time.
Related: The 11 Best Podcast Editing Software For a Perfect Show
Contents
How to Fade Out Music in GarageBand Automatically
Let’s start with the basics: how to fade out your music in GarageBand automatically. This method is perfect if you’re new to the software or just don’t have a lot of time to spare.
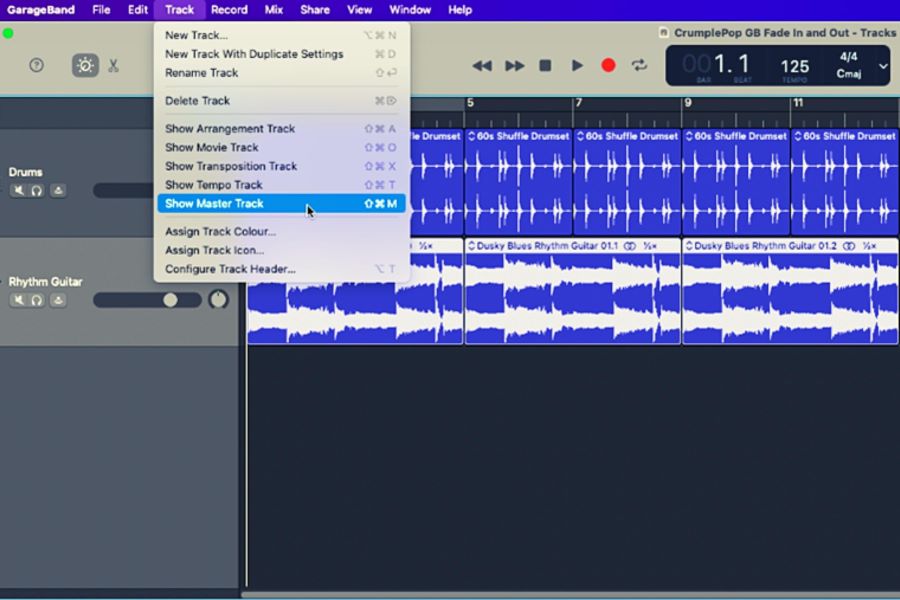
1. Show the master track
Start with selecting the “Show Master Track” option from the “Track” menu. This will make the master track visible in your project.
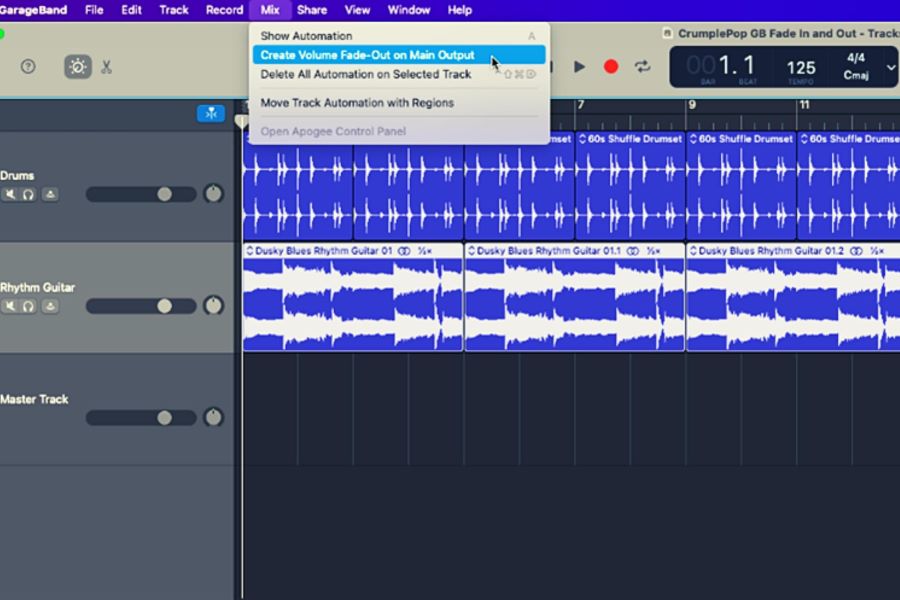
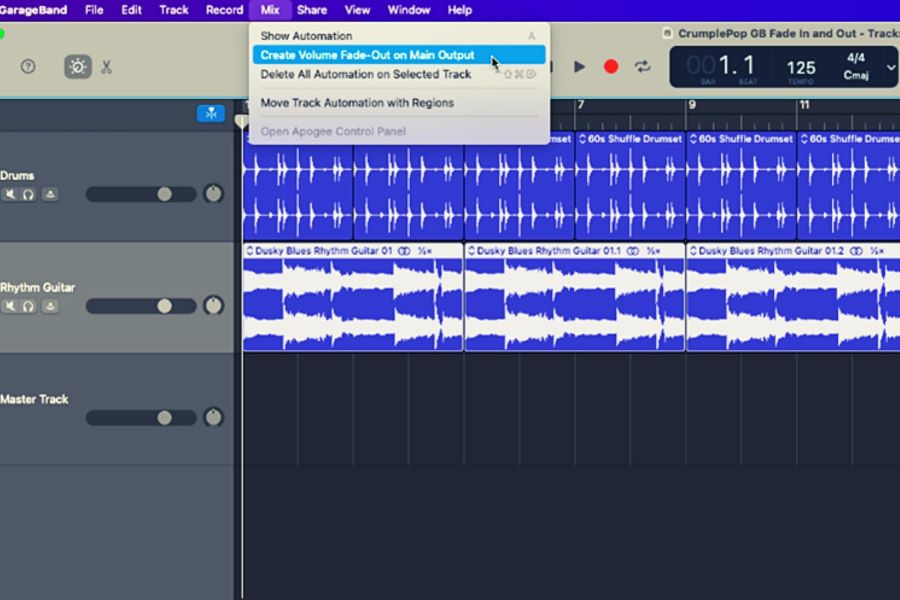
2. Add the fade-out option to your mix
Next, add the fade-out option from the song settings to your mix by selecting “Mix > Create Volume Fade-Out on Main Output.” This will insert a volume fade-out at the end of your project.
3. Automation controls on tracks
Finally, make sure the automation controls are turned on for all of your tracks. You can do this by selecting “Mix > Show Automation,” typing “A,” or clicking the automation icon in the Tracks area menu bar.
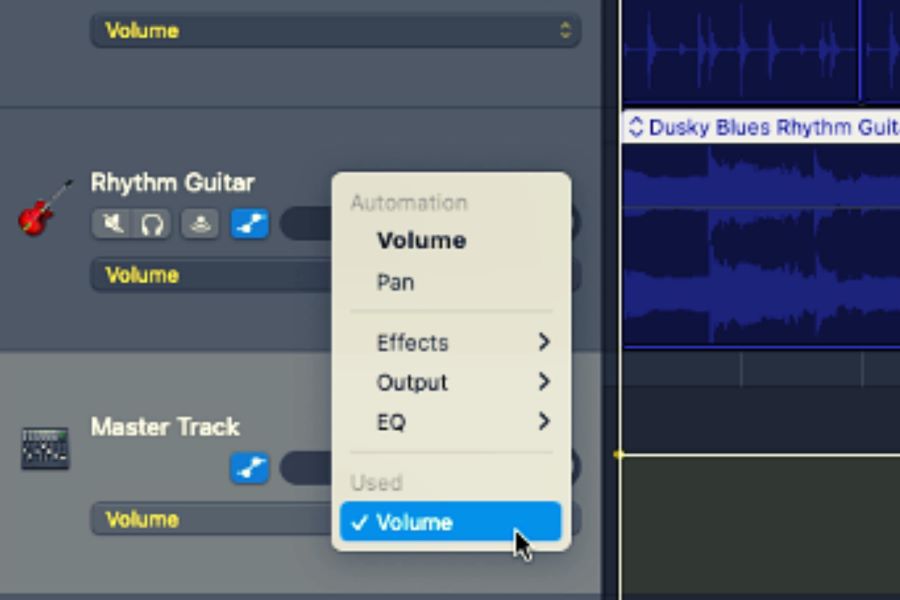
4. Don’t forget to set the automation menu
In the automation menu (located in the master track header), select Volume. This will ensure that any volume changes you make will be automated.
Automation is when a track’s volume level occurs at all points across its timeline. If you don’t see the automation line or if it’s barely visible, click on the audio track.
How to Fade Out in GarageBand Manually
Now that you know how to fade in GarageBand automatically, let’s move on to the manual method. This is a great option if you’re looking for more control over your fades or want to create custom effects.
1. Show the master track
Just like before, you’ll need to start by selecting the “Show Master Track” option from the “Track” menu. This will make the master track visible in your project.
2. Add volume points
Next, add the volume point to your project by clicking on the volume line at the locations you want to make adjustments.
3. Control the intensity and timing
Finally, control the intensity and timing of your automatic fade-out effect by selecting and moving one or more of the volume points. You can do this by dragging it up or down, left or right.
When selecting and moving one or more of the four volume points, pay attention to the following:
- The number of volume points you select will determine how many times the fade-out effect is applied.
- The order in which you select the volume points will determine the timing of the fade-out effect.
- The intensity of the fade-out effect will be determined by how far you drag the volume points.
And that’s all there is to it! Fading out your music in GarageBand is just as easy as you fade in once you know how. So get creative and experiment with different methods to find the perfect sound for your next project.
Why Fade Out Music in GarageBand?
Fading out your music in GarageBand is a great way to end your podcast episodes on a high note. It also allows you to transition seamlessly to any commercials or other content you may have lined up.
Not only that but fading out your music can also add a touch of professionalism to your podcast. It shows that you’re in control of your audio and are aware of the proper techniques for creating a great sound.
There are four main reasons to fade out music in GarageBand:
1. To create a smooth transition between tracks
If you’re creating a mix, you’ll want to make sure the transitions between your tracks are smooth and seamless. Fading out your music in GarageBand is an easy way to do this. Simply add a fade-out effect to the end of your track, and your listener will be taken on a smooth, effortless journey from one track to the next.
2. To add interest and variety to your music
Fading out your music in GarageBand is also a great way to add interest and variety to your tracks. By fading out your music, you can create unique soundscapes that will captivate your listeners. So don’t be afraid to experiment with different methods and techniques to find the perfect sound for your next project.
3. To create a professional-sounding mix
If you want your mix to sound professional, you’ll need to pay attention to the transitions between your tracks. Fading out your music in GarageBand is an easy way to create smooth, seamless transitions that will make your mix sound polished and professional.
4. To avoid abrupt endings
Abrupt endings can be jarring and off-putting for your listeners. If you want to avoid this, simply add a fade-out effect to the end of your track. This will ensure your track ends smoothly and effortlessly.
Related: GarageBand: How to Record Multiple Audio Tracks At Once
Should I Always Fade Out My Music?
No, you don’t always have to fade out your music. In fact, there are times when fading out your music can actually be detrimental to your track. Here are a few things to consider before adding a fade-out effect to your track:
1. The genre of your track—The genre of your track will dictate whether or not you should fade out your music. For example, EDM tracks often have abrupt endings, so fading out your music may not be the best option. On the other hand, if you’re creating a ballad, fading out your music can add a touch of drama and emotion.
2. The mood of your track—The mood of your track will also dictate whether or not you should fade out your music. If you’re trying to create a sense of suspense or tension, fading out your music may be the perfect way to do it. On the other hand, if you want your track to have a more upbeat, positive feeling, you may want to avoid fading out your music.
3. The length of your track—The length of your track is also an important consideration. If your track is short, fading out your music may not be necessary. However, if your track is long, fading out your music can help avoid abrupt endings.
4. Your personal preference—In the end, it’s up to you whether or not you fade out your music. If you think fading out your music will benefit your track, go for it. However, if you don’t think fading out your music is necessary, feel free to leave it as is.
Related: GarageBand Jingles: How to Create and Add Them to a Podcast
Final Thoughts
Fading out music in GarageBand is a great way to create smooth, seamless transitions in your tracks. It’s also a great way to add interest and variety to your music. By learning how to fade out your music in GarageBand, you’ll be able to create professional-sounding mixes that will impress your listeners.
So what are you waiting for? Go out there and start fading out your music in GarageBand today!


