Do you have a recording that is plagued with background noise and static? If so, don’t worry – we can help!
This guide will teach you how to remove unwanted noise or static from an audio recording using Audacity, a free and popular audio editing software. But, first, we’ll show you how to identify and isolate the noise and remove it altogether. So, let’s get started.
Related: How To Edit A Podcast In Audacity
Contents
What is the Noise Removal Tool in Audacity?
The Noise Removal tool is one of the most valuable tools in Audacity. It can remove background and static from audio stereo track recordings and video files. This is a prevalent problem that can occur when recording audio files type or videos; the Noise Removal tool can be a lifesaver.
In a few words, here is how to use the Noise Removal tool; select a section of your audio or video that contains only background noise. Then click the “Noise Removal” button in the toolbar and choose “Get Noise Profile.” This will tell Audacity to analyze the selected section and create a background noise profile.
Next, select the entire track you want to clean up and click the “Noise Removal” button again. This time, choose “Remove Noise,” and Audacity will use the noise profile to remove the background noise from your audio or video.
That’s all there is to it! The Noise Removal tool is a powerful and easy-to-use tool that can save you time and frustration. Give it a try the next time you have an audio or video recording that contains background noise. You’ll be glad you did.
Related: How to Use Audacity Equalizer and How To Remove Reverb In Audacity
What the Noise Reduction Tool Can and Can’t do?
The Audacity noise reduction tool is powerful and can remove unwanted noise from audio recordings. But it is crucial to understand what the tool can and cannot do. One of the most common misconceptions about the tool is that it can be used to eliminate all noise from a recording. However, this is not true. The tool can only reduce the noise level in a recording, and it will never be able to eliminate it. This is because the tool works by identifying and then reducing the amplitude of transient (i.e., brief and sharp) sounds in a recording. However, it cannot identify and reduce the amplitude of sustained sounds, such as background chatter, air conditioner working, ambient sounds, or traffic noise. As a result, the tool can be very effective at reducing the level of unwanted noise in a recording, but it will never be able to eliminate it.
Related: How To Make Your Voice Sound Better In Audacity
How to Avoid Noise in the First Place?
Background noise and static can be a real pain, especially when trying to record audio. Fortunately, you can do a few things to reduce or eliminate background noise and static in Audacity.
You can do a few things to reduce background noise and static in your recordings. First, try to find a quiet space to record in. A room with thick walls and carpets will help to deaden sound. If you can’t avoid recording in a noisy environment, try to isolate the noise source. For example, if you’re recording someone speaking, have them sit in front of a microphone with their back to the noise.
As we stated before, the best way to avoid background noise and static in your recordings is to record in a quiet room. However, if you don’t have access to a quiet room, you can do a few things to minimize the amount of background noise in your recording in noisy environments.
- Use a quiet microphone. A quiet microphone will help reduce the amount of background noise picked up by your recording device.
- Use a pop filter. A pop filter will help to reduce the number of plosives (p) and sibilance (s) in your recording.
- Use acoustic treatment. Acoustic treatment will help absorb sound, reducing the amount of reverberation and echo in your recording space as well as dampen any annoying noise in the room. If you’re looking to reduce echo in your audio using Audacity, you can check out our guide.
- Use a noise gate. A noise gate will help reduce the amount of background noise picked up by your microphone.
If you follow these tips, you should be able to minimize the amount of background noise in your sound file and improve the audio quality.
Related: Do I Need a Pop Filter for the Rode PodMic?
How to Remove Background Noise in Audacity?
Audacity is a simple but powerful audio editor that can be used to remove background unwanted noise from your recordings. The noise reduction process is reasonably simple and only requires a few simple steps. Let’s take a look at how to remove background noise in Audacity. If you haven’t downloaded it, be sure to get it from Audacity’s official website.
1. Import or Record a Voice Over
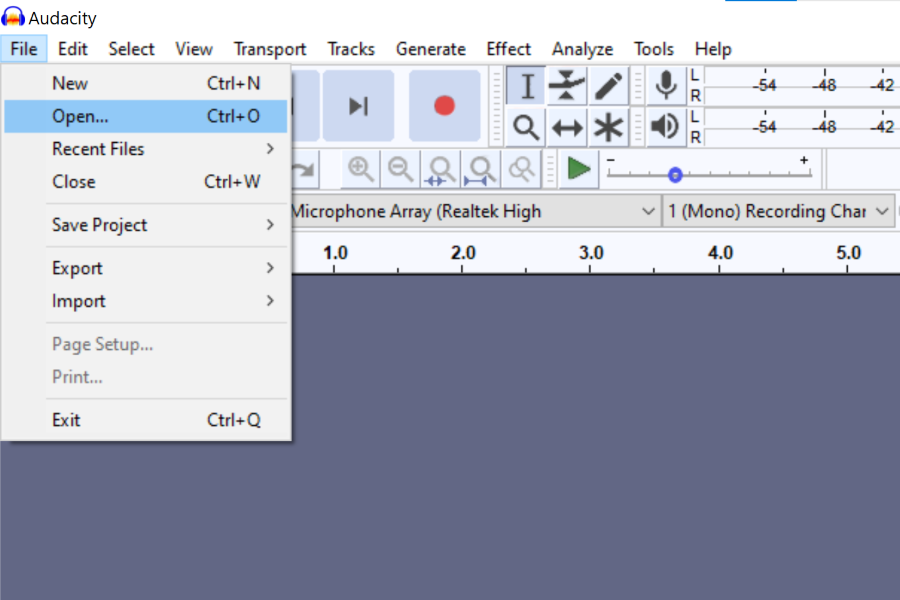
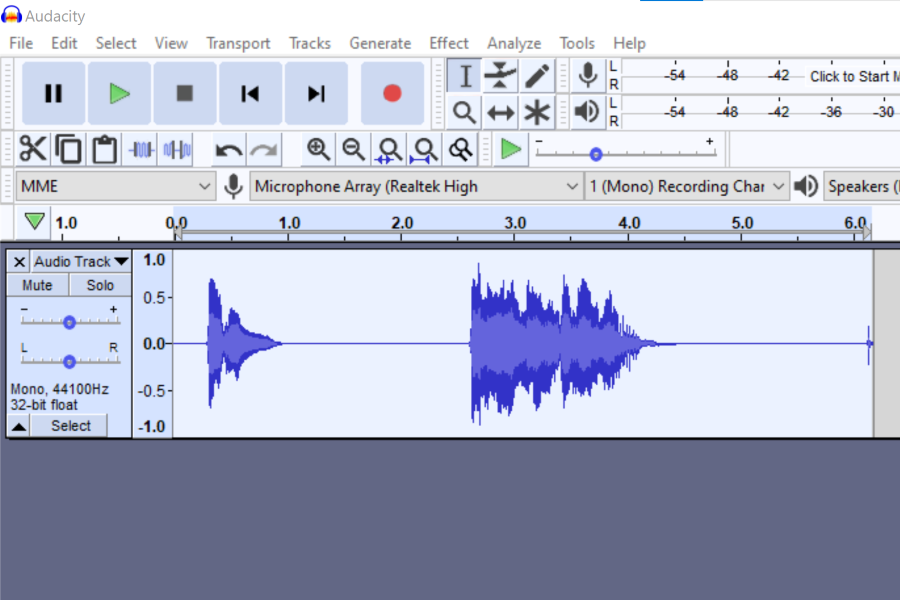
The first step is to open Audacity and the file we’ll be working with.
Be sure to work with an audio clip with possible minor background noise. You can either record it yourself with Audacity or import it from outside sources and then edit out any unwanted noises.
If you are editing a video file, you’ll have to export the audio separately in your video editor before importing it into Audacity.
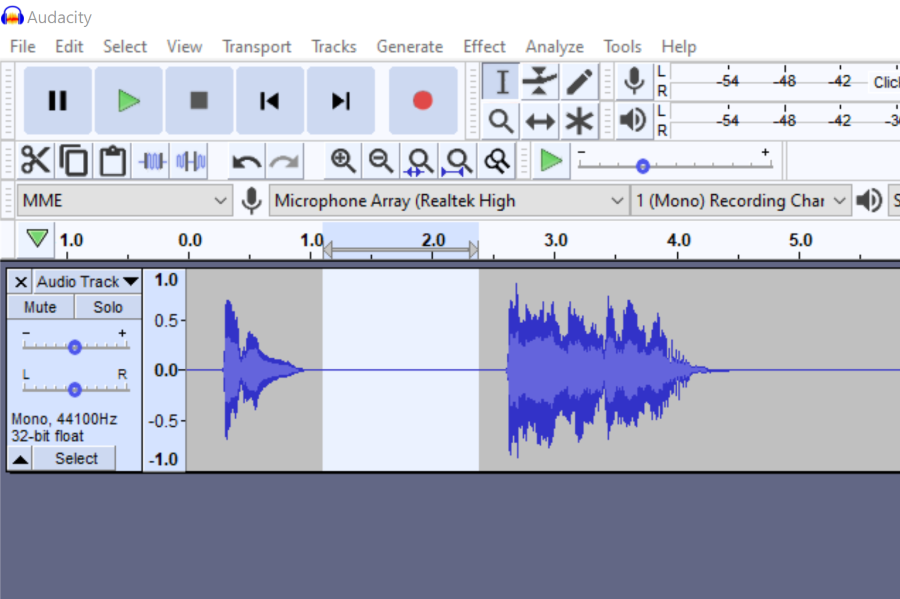
You should be able to see the audio track in audacity before we begin.
To import an existing audio file, click “File” > “Import” > “Audio.”
2. Select a Noise Sample
The easiest way to get rid of unwanted background noise is by selecting a sample from what you want to be replaced. Select a few seconds of silence.
To do this, with the selection tool activated, left click at the start of your chosen portion and drag over it with the cursor to the end of the section of silence that contains some amount of noise; the selection should last no longer than two seconds and consist of white noise from the room.
3. Get a Sample of the Background Noise
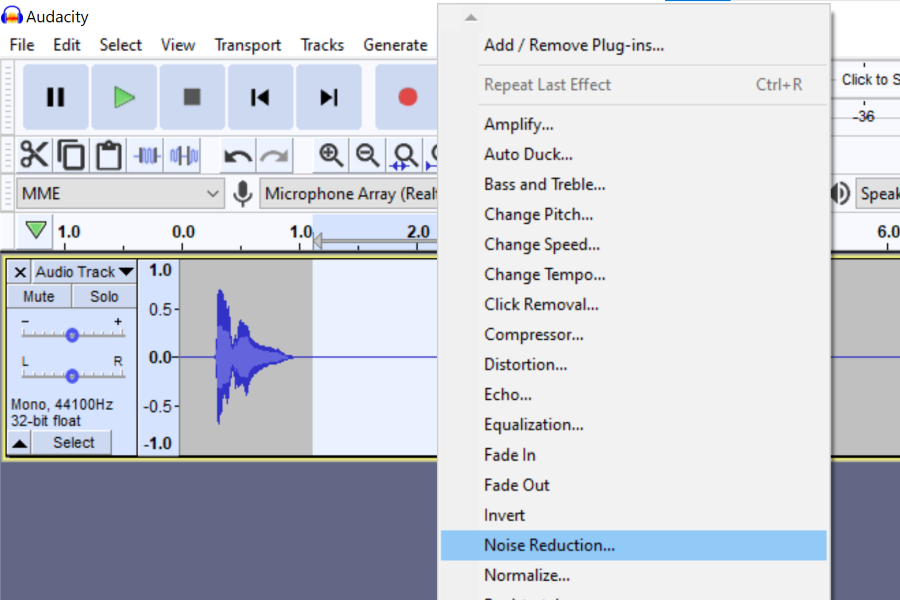
With your sample selected, go to the noise reduction tool via the effects menu by clicking “Effect” > “Noise Reduction…” in the drop-down menu to open the noise reduction window.
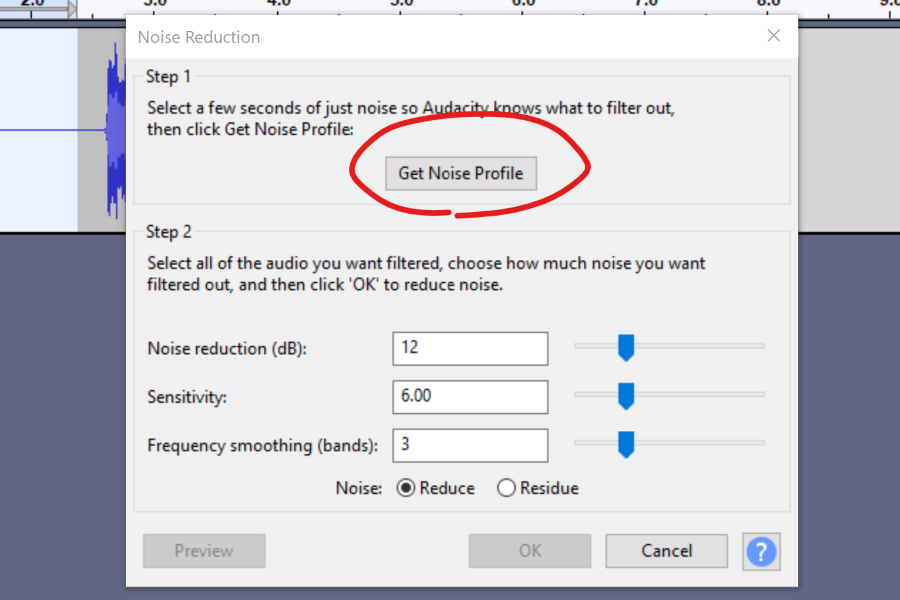
After that, click the “Get Noise Profile” button and wait for a few seconds while this function captures all frequencies as a noise profile. This process will analyze the “room tone” and we’ll be able to remove it in the next step.
Room tone is a catch-all term for things in the room that make a slight cotinuous noise like computer fans, wind noise, or any other non-descript ambient background noise.
4. Select the Entire Track to Apply Noise Reduction
To do that, you will need to ensure that the whole recording is selected. You can do that by either click on “All” in the drop-down menu or use Crtl + A shortcut to select the entire track.
5. Set the Right Settings
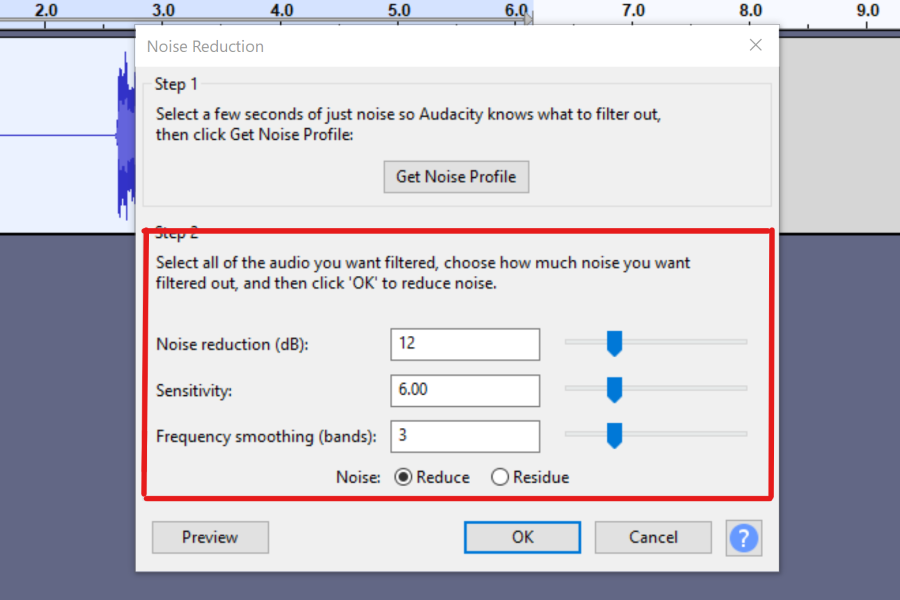
Then click on “Effect” > “Noise Reduction…” again and try the default settings.
If those don’t seem to work well, adjust the settings accordingly following these descriptions.
Here is a list of the settings and what they do:
Noise Reduction (dB):
The tool will apply volume reduction in decibels to the noise signal we captured in the previous step.
You’ll want to play with this but try to limit it to the lowest number that gets the best results. If you were to use higher numbers, you risk damaging the signal you want to keep as well as making things quieter.
Sensitivity:
This relates to how much of the signal we consider to be “noise”. We can put a 0 in here to disable it and the higher number we set we more noise will be removed (and potentially more of the desired signal, so we need to balance it).
As mentioned before, we’ll want to set the sensitivity to the lowest number that gets the best results as well.
Frequency Smoothing (bands):
A value of 0 disables the smoothing. Anything above 1 will have the effect of using neighbouring frequency bands to do the smoothing.
This option modifies the desired signal but may make it better if there already artifacts like pops in the original recording.
The important part here is that the default is 3. If you are treating music, you’ll want to play with a lower number than this and if you are treating voice recordings, a higher number.
Noise:
Reduce: The output of the operation will be the desired signal without the noise. This is the default and what you most likely want.
Residue: With this option you can hear what will be removed. This option is handy to check if there is anything from the desired signal as that would mean you are applying too much noise reduction.
6. Apply Noise Reduction
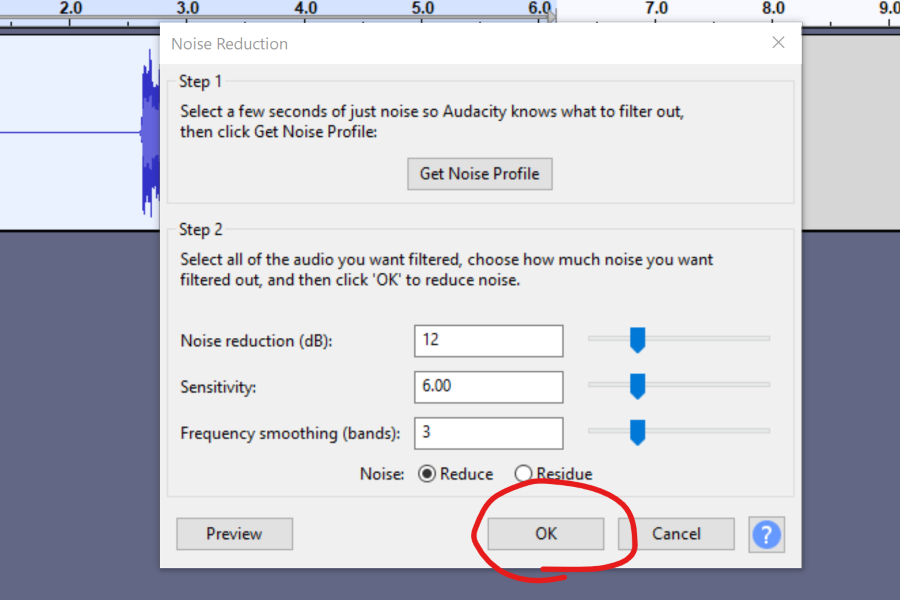
Click “OK” to apply the Noise Reduction to the selected portion of your track.
Related: How To Delete an Audio Section in Audacity
7. Play with the Settings until you get it Just Right
Removing noise is more an art than science so inevitably you will have to go back and play with the settings until you get it right. The best way to do that is to undo the Noise Reduction each time to make sure you apply it once correctly before you repeat noise reduction.
To undo the Noise Reduction you just applied you can hit the shortcut CTRL+Z or go to “Edit” > “Undo” in the top bar menu.
Another way to get to the same place is to use the preview button in the noise reduction screen to get a preview of the noise reduction effect. You can do this from the same window until you get to an acceptable level of noise levels.
8. Export the Final File
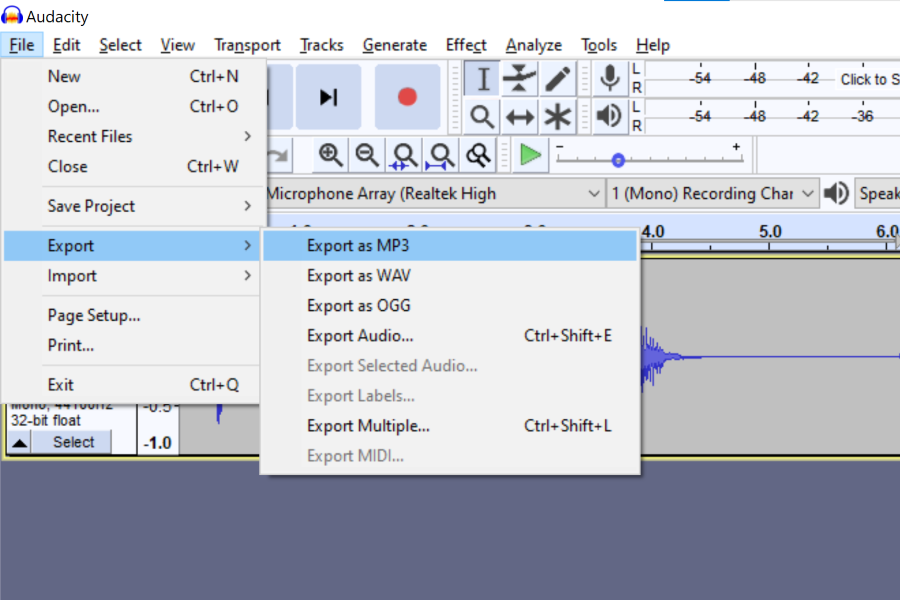
Once you are happy with the results, go to File > Export and select the audio file type you would like to save it as.
For podcasts, you’ll want to select MP3 if this is the final edit to get a small mp3 file you can upload to podcast hostings. Otherwise export it as WAV. If you want other file types, there are more options if you select “Export as Audio…”.
If you are editing YouTube videos you’ll want to export as WAV and use the video editor to compress the audio on the final video export step.
Related: How to Lower the Volume of a Section in Audacity
Conclusion
Whether you’re trying to record a podcast, make a video or capture some audio for a project, unwanted background noise can ruin the final product. In addition, noise can be a considerable distraction and even make it difficult to understand the words someone is saying.
This guide shows you how to remove background noise in Audacity using the built-in Noise Removal Tool.
We’ve also shared some tips on how to avoid noise in the first place and what you should keep in mind when using the Noise Reduction Tool. Interested to learn another way to reduce noise and make your recordings sound more professional? Check out our other posts on how to sync audio and video, how to splice audio, how to mute a track, how to normalize audio, and how to muffle audio in Audacity.
If you have any questions or feedback, please leave a comment below.
Thanks for reading!

